Giant New Year's toy do it yourself. Making stunning Christmas toys for the Christmas tree with your own hands
New Year tree - the eternal embodiment of joy and holiday. And not only for children. Adults, too, with poorly hidden trepidation, await the onset of the new year, when all the most cherished dreams are carried out. And for this you need not so much - just decorate the Christmas tree with cute baubles. It is said that this is this ritual and helps to come true in any desire. Especially if these are made.

Of course, the Christmas tree is easier to decorate expensive purchased toys: huge glass balls, cheerful electric garlands, a bright rain. No one argues that such a tree will look very presentable and elegant. But will there be so much soul in a cold glass toy, as in a touching cardboard toy, a suitable personally, and even children's handms. Over the years, of course, the purchased, and homemade toys will wind, lose the past gloss. But if the impeccable, but constituted factory decoration you just throw away without a drop of regret, then the toy you did with your child will not throw a hand. And then you will try to breathe new life into it, repair the broken details, put or tinker. And not because you will feel sorry to throw off the piece of paper or fabric, but because in this naive product - the particle of your soul, the fragment of your child's child. By touching this craft, you seem to re-survive the moments of the long-stayed years, which you can return, except, in such memories.

So, consider what we can do. The simplest and most affordable thing that we can have to repair the old toys of their children and sew ribbons to them, if it is a soft toys, stretch the braid through the hole or tie it to the finest part of the toy from solid materials. Such a small toy will be very cute to look at the Christmas tree.
The most common design of Christmas decorations is paper toys. To make a simple, but very pretty festive toy-ring with your own hands, you will need only sheets of color cardboard and paper, and more scissors and glue. First you have to work on a cardboard ring, which, however, can be replaced with a decorated - salamic or painted, ring from the tape or any other suitable element. Then from the strips of white or colored paper, a width of less than the ring of the ring, the harmonica is made and is glued from the inside into the base ring. After that, it will only be left to add bright strokes with the color of the color of the squares. They are flexing in pressure and symmetrically pasted into the folds of the harmonica.
How to make Santa Claus do it yourself?
To make a new year toy do it yourself, You can come up with something your, unusual and interesting. The original will look at the decoration in the form of a lamp from felt or magic snowflakes from beads shining like a diamond paint. And you can make a real Santa Claus. To create this kind old man, which will be the original decoration of the child's room, you will need a paper plate, cotton wool, colored sheets, markers, watercolor paints, white glue, acrylic paint white, scissors and, of course, a good mood. So, you can proceed.
- First, the paper plate is taken and paint in white color acrylic paint. After drying, the peel on the back side of the plate is glued with a nose from a crumpled paper ball, which is glued with white paper flaps on the principle of Papier-Masha. By the same principle, you need to make cheeks and eyebrows grandparents, and after drying the glue to paint everything into white.
- After a complete drying of the nose, it is necessary to mix the white and brown paint shorter to obtain the natural color of the face. The resulting shade is applied to the plate. A little red shade is added on the cheeks and the nose.
- It is checked, whether all the paint dried, after which the facial features are diammithers. When the child does not like to draw or it does not quite well do it, you can stick your mouth and eyes from the same paper harnesses, painted in white, and then in a natural color: reddish lips and blue eyes.
- Further of the red paper triangle making a hat.
- On the tip of the caps, we glue a small cotton ball from which Pompon will turn out. After that, a wide wool strip is taken and glued to the lower part of the face. So it turns out Beard Santa Claus. To make eyebrows and mustache, more subtle small stripes are taken, which symulates gorgeous mustache and bushy eyebrows.
- After drying glue toy is ready!


By exactly the same principle you can make a snowman's head, Pinocchio or another funny face. It would be only a desire!
Another easy way to make a beautiful toy is to re-establish the heart of the foam heart. For this, the adhesive gun is fixed with a pistol on the rib toys. Then begin to stick beads, and they are laid strictly in one direction, forming the turns from the edges to the center. Beads are not necessarily the same. They can be selected in different colors and sizes. Reaching the middle of the heart, the bead thread need to trim and then glue only the small parts of it, cutting the desired amount of beads with scissors. After complete filling of one side of the heart, you can move to another. At the end, thread or ribbon for hanging toys are fixed.
New Year's toys do it yourself: garlands and balls
In December New Year's days, decorate the house and create a festive mood will help christmas tree garland. And if you connect to its manufacture the whole family, then the inside of the winter evenings will be provided. So, one of the simplest, but very original options for such an ornament - garland made of paper pomphones. For its manufacture, you will need paper of different colors and different textures, scissors, rope and glue.
Initially, the sheet of paper is folded along the width of pressure, then - once again in length.


On the side without folds with the help of scissors, an incision is made - a band in a half-meter full length, leaving a fold in 6 centimeters. The sheet turns around and is cut in the midst of two parts, one of which is postponed to the side. The sheet is completely revealed and the leaflet dried on two sides of the strips with a whole untouched with scissors part in the middle. Then you need to take your fingers for the middle and twist the leaflet, not assigate cut edges. After the center of the leaflet is completely twisted, you need to bend it to the loop formed and then glue it at the base. After the rope of this tassel, you can start making the following. This shaggy caterpillar will become a cheerful addition to the Christmas decor.


New Year's paper garlands do it yourself
There are many types of garlands that are easily made on an ambulance hand, remember, we have already written about how to make a garland yourself. So on the rope you can ride the patchwork of multi-colored fabric.
If the rope is used through the tissue triangles, it turns out an excellent garland from flags! If we make pumps from the shaggy yarn and ride them on the thread, it will turn out the garland, which the child wants and just play, so cute and fluffy.


And when tissue strips tie to rope with bows, it will be very even a flirting garland. Yes, and the remains of old wallpapers are also quite successfully applied to create a New Year's garland. And even if the carved paper napkins fold in half, put on the rope, glue with each other in the corners, then it will also be excellent garland. Vintage garland can be obtained if cut from multicolored paper heart and penetrate their thread. Such a touching romantic garland can become not only a Christmas decoration, but also the attribute to the day of lovers. This symbol of love may well provoke its appearance for the new year. Do not believe? And you check: invite your friend to help you decorate the Christmas tree, and, as if by passing, make the garland from the hearts together. Make sure that pleasant consequences will not make long wait.


Such christmas christmas garlands do it yourself It is more convenient to make from ordinary colored paper for manual labor, but better if it is bilateral. For example, you can take red, pink and white paper. The combination of these colors will create a very gentle ribbon-garland. Also, for its manufacture, you will need: handle, scissors, ruler and stapler. Strips are cut from paper, the width of which is 3 centimeters. In order for your child to participate in the work, you can draw every line of the cut, and it is offered to praise them. Then every strip folds in half. The tips are flex and fasten with a stapler with each other. With each subsequent strip, the same actions are made. Each heart is connected to the previous and subsequent. The work continues until the desired length of the garlands. And so that the hearts do not stretch during the tension of the garlands, it is possible at the base of heart to pierce the stapler paper. Here you have a heart garland.
In addition, or rather - most often on the Christmas tree, balls are cling to decoration. These traditional homemade toys are very different: glass, paper, foam. By the way, if the glass ball can quickly break up, the toy of the foam is very easy to scratch, breaks, crumbs. If you have such reversible balls, they can be very quickly turned into a real precious decoration using small plastic beads and decorative cords for decorative cords - for example, a dairy-white color.
From the tools you will need a glue hot gun, scissors and tweezers. In this way, you can not only update old foam balls, but also make not very interesting plastic. And the diameter of used beads and cords can be the most different. But, naturally, small balls are better to decorate a thin cord and thread of small beads, and large toys can be saved both large and small beads. Even more original, the balls are decorated with three cords or threads simultaneously. First you need to conclude ready-made garlands on individual threads. Then the cord is taken, and its end is immersed in a foam ball with a manicure scissors or ordinary tweezers. A little glue is applied to the ball of the cord near the cord fastening site, and the tip of the bead thread tip is attached. The next part of the ball is gradually covered with glue and slowly, the layer behind the layer, beads and cord are stacked, until the entire surface is filled with entirely. Cuts are cut off, the end of the lace is to the foam. In the end, with the help of a thread with a needle, passed through the cord web, a loop is made to hang toys.


Often we do new Year's toys do it yourself FROM BEADS. From it, very pretty Christmas decorations are really turned out, which can be thrilled throughout the house, which will help create a great New Year's atmosphere, we have already written as weighing a tree from beads. To make such charming toys, you will need red beads, ribbon and wire. So, the beads are driven onto the wire, and then wire toys are formed from the finished hard boats, for example - asterisks, heart or christmas. There will be no special work, but if you hang such toys on the Christmas tree, pre-decorating them with ribbon bows, the result will be very nice.
Returning to the same balls, you can try to make christmas toys with a decoupage technique. To do this, you need aged glass Christmas ball, sheets from a tank notebook, PVA glue or special - for decoupage, glyter and paint silver color, a special stamp with an inscription for Christmas topics, ink, a small bell, a ribbon for tie a bow, as well as a thin twine for Peltlek. Although all these components can be replaced by the fact that you have at hand, leaving the main thing - a ball, glue and napkins. The technique of performing toys is very simple, not requiring additional skills. Initially, a little white acrylic paint is laid out onto the palette, then the sponge must be carefully blocked into the paint and it blellped it to the entire surface of the ball. On the sponge you need to constantly pick up paint, then it turns out the similarity of a snowy flying. So all the balls are harvested and left for complete drying. Meanwhile, you need to prepare napkins. To do this, the top layer of napkins is separated, the most colorful. Then half with water is divorced pva glue and the motive is glued to the ball. It begins gluing from the central part of the motive with uniform progress towards its edges. All motives are also attached. In general, everything is done standard, as with any decoupage, just with a greater fraction of shine and decorations.


Interesting balls are obtained from ... book pages or, for example, pieces of felt. So, on the flaps of the material you choose, the circle contours are designated (you can circle any household subject, for example, a cup). With the help of a sewing machine, approximately 10 circles are stitching along the diameter. Behind the absence of the machine you can cope with the stapler. The line must go smoothly in the middle of the centers of all circles. The clips are connected to the face in a checker order: it is one compound in the middle, then closer to both ends of the seam of two connections. Etc. It turns out the similarity of a book unfolded by 360 degrees with oval pages bonded by two then in the middle, then at the edges. It gives a paper toy the effect of a volume corrugated ball. At the end of the work is attached to the loop. Already such a toy can be cling to the Christmas tree, but it is better to additionally apply decoration with sequins and glue. Better, of course, if there is ready glue with sparkles.


A ball-cobweb looks very unusual and sophisticated. It will take a simple balloon for its manufacture, any threads, good glue (best - PVA), as well as your imagination and perseverance. Naturally, the ball is inflated to the desired sizes (by volume of the future decoration), is well tied and lubricated with ordinary oil. Then the thread watches in the glue, the surplus of glue is removed from it, passing the thread through compressed tight fingers. Although it is possible to make a special container in which glue is poured, and a small hole makes itself in the lid. Motok is placed in the container, the thread tip is passed into the hole made and it gradually pulls out, so that it is dosed with glue. Then this thread gradually excavated the whole ball. At the same time will have to be stockpit, since the first rows of the thread can simply slip from the ball. Thread must be kept in lightweight (slightly tense). After completing the winding, the ball must be suspended for drying. But you should not dry it with a hair dryer or over the heating battery, since this ball can burst. The thickness of the thread can be selected at its own discretion. But you do not need to rush. Let the ball will die, and then it will be necessary to neatly pierce it with an ordinary needle and gradually remove the frame out of the threads. Frozen threads impregnated with glue will well hold the form. But it is not all: the ball can be reappeted, again, at your discretion.


New Year's toys do it yourself: Christmas trees and snowflakes
Most Popular new Year's toys do it yourself from paper - These are ordinary snowflakes. They do not require any special skills, no expensive material, no special time spending. More than just, if not to say it elementary. For such a New Year's decoration, you will need an ordinary paper - from white to color, glue - better, of course, the same PVA, clips stationery and scissors.
Methods for their cutting are the most diverse: from the simple, such as those that we cut out in school years from the airtal sheets, to complex volumetric snowflakes. Folding by the origami or cutting method by the way Kirigami is made according to special instructions with the demonstration of each step. If everything is more or less familiar with Origami, then the snowflakes in the technique of Kirigami are made first by folding the square diagonally, then bending the corners to the middle of the triangle, which will be divided into three identical triangles. Then, on bends and from above, several parallel curly cuts are made, the tongues of which after turning the snowflake will need to be subjected to the center for the basis of creating the similarity of the petals. In addition, the snowflake can be embellished, lubricating glue and sprinkled with sparkles. So the snowflake will become even more beautiful and brighter. The method of enclosure of individual parts is made of a postcard in the form of a snowflake.


Unexpected soft New Year's toys do it yourself It turns out, for example, in the form of a Christmas tree, we have already written about how to make the Christmas trees with your own hands. For the manufacture of such a Christmas tree from tools and materials, you will need:
- hook, the size of which is suitable under the thickness of the thread,
- soft material (as for filling pillows),
- white bead packaging,
- the remains of three shades of green threads,
- needles and thin threads for sewing suitable by tone
- golden ragged threads.
At first, according to the scheme, the stand, the trunk of the Christmas tree and the triangular base. When knitting the triangular base, a diagram in which each row is repeated four times. The Christmas tree knits striped, each strip will have three rows width. Alternation bands are carried out according to the scheme: green dark tone, green, green light shade.
So, first five air loops are closed into the ring, and then knitting on such a scheme:
- three identical rows of 8 columns without Caida (dark green color);
- row of 8 columns without Nakid (green);
- two identical rows of 14 columns without Nakid (green);
- two identical rows of 14 columns without Nakid (light green color);
- a row of 20 columns without Nakid (light green color);
- three identical rows of 20 columns without Nakid (dark green color).
The toy is decorated with large white beads or beads as if it new Year's toys. Send beads to the base arbitrarily. Then the base is stuffed with a soft filling material.

The stand of the Christmas tree and the trunk will fit according to such a scheme:
Five air loops are closed into the ring, then three identical rows of 8 columns without a nakid (brown color) are pronounced. So it turns out the trunk of the Christmas tree;
The base is further liked by the same scheme that is presented at the beginning of work (dark green color).
To strengthen the base, the circle is cut out of the cardboard, the diameter of which is equal to the diameter of the knitted stand. Then the knitted stand is sewn to the cardboard. The first row of loops passes around the trunk of brown threads, the second - along the outer edge. It will only be left to connect the Christmas tree and stand, and the real New Year's beauty will delight you, and not one year. Yes, and the real fir can be saved.

There are still many different options for homemade New Year toys. You only need to include your fantasy and try a little. And then certainly any of your desire will come true. After all, the first is to make creative christmas decoration - came true. Well, who else doubts the magic of the New Year toys?


Neither bright balls from the supermarket, no lights flashing with different colors, nor expensive design kits for the decoration of Christmas trees do not compare with the decorations made by their own hands.
Of course, such jewelry from the supermarket will make an evergreen guest bright, modernly decorated, but it is unlikely to be able to bear the New Year's mood so happily as manufactured toys.
Ways to make christmas toys a lot, but the simplest, attractive and not requiring a lot of time - toys made of paper. To create them, it may be necessary to need quite a bit, the submitted materials that are stored at each host of the house. Burst the patience and wings for creative fantasy flight.
New Year's balls
What is the most common decoration on the New Year tree? Of course, the balls! Glass, plastic you can always buy in the store, but we will try to make them from tight paper. This includes color cardboard, old postcards and covers of unnecessary magazines. Color cardboard balls, monophonic, give the Christmas tree or room that you want to decorate a single style, and multicolored balls will bring the atmosphere of the holiday, magic and winter fairy tale.
Because sitting to make a new toy, prepare:
- dense paper;
- use old logs, cartons or boxes from candies with bright drawings;
- glue, it is best for PVA;
- scissors;
- circle or any other item that you can circle by getting a smooth circle.
Take your cardboard and circle on it twenty-one the same circle, then cut them out with scissors. Each circle will have to be folded as follows: Bend the circle in half twice, from the same side, after break, we will schedule the center of the mug.
Again, bend only one of his side, so that the edge of the mug was exactly on the intended center. Bend the two sides again so that you will get a triangle. In one of the twenty circles, cut this triangle, it will serve as a kind of stencil for other circles. All that you remains is to apply triangles to the other circumference, to circle it and bend the edges of the circles outside the office.
Take the ten first circles and stick them in a strip, alternating: five down - five up. The resulting strip glue into the ring, this will serve as the basis for the toy.
The remaining ten divide five, and glue them into the circle. By gluing them, you will get two lids.
The top and bottom cover should be glued to the base in the same way. Think about the loop, for which you can hang the toy.

Make such a New Year's toy. Children will easily help you: you will need scissors, colored paper, packaging ribbons.


See more:

Today, on the store shelves, you can find a huge number of the most diverse Christmas toys, so turning the usual Christmas tree in real festive beauty will not be difficult. However, the new year is a special day! The day when the old year remains behind, and new adventures are waiting ahead, new events, new victories. But after all, the old year did not pass without a trace, from him [...]
An excellent idea for a Christmas tree toy will serve as a miniature paper Christmas tree. You can make it from tight paper or old postcards, and you can hang your masterpiece on the usual thread.

By the way, if you do not have a real Christmas tree, you can make your magic New Year tree. And more ideas see the article:

New Year tree, of course, the main attribute of the most important winter holiday. Do not do without a forest beauty will not work, the atmosphere is not that, and where is the good grandfather gifts put? It so happened that in the house to the New Year holidays decorate the Christmas tree: someone puts living, someone prefers artificial, and someone paper. Christmas tree made of paper can not only replace the Christmas tree [...]
Large Snowflake
Snow - Obviously, the most important attribute of winter, and the snowflake is the main decoration of the house for the new year. Snowflake can be cut out of paper, glue the window, as is often done. What about bulk snowflakes? Make it also just like cut. To create it, you will need only scissors, stapler and, of course, paper.

Cut 6 squares of the same size, bend each square diagonally, and after half. For the bends, make parallel cuts with scissors. Expand the squares, and the internal stripes wrap and secure each other. The resulting petals are connected together by the stapler, although you can use and glue. Such a large snowflake can be sprinkled with glistening or assemble the garland. You can decorate the window, walls or suspend under the chandelier.


What could be easier to jewelry than big, volumetric candies from paper? Make them very simply, for example, from the old foil or beautiful wallpapers remaining from repair. Be sure to have paper with a bright pattern. And for this, only you just need to measure a small rectangle, twist the tube, tied up at the ends of ribbons. If you are afraid that your toy will lose form, then twisting, between the paper you can put any unnecessary thing in the form of a cylinder, for example, a cardboard cylinder from toilet paper.

Toys with family photos
Some types of paper balls can be done using family photos. Such New Year's toys will be the most special, because important and significant moments of the year of the year, as it were, will remain with you, and in the next new year the toy memories will recall the pleasant moments. By the way, do not forget about pets, let them stay on your memorable toy, because a dog, a cat or even guinea pigs are also waiting for New Year holidays!

Flashlights from childhood
And lanterns? You must remember since childhood, how to make lanterns from paper. A little smoking, you can easily come up with a new design for a simple flashlight. To diversify a completely simple handicraft, you can decorate it with sparkles, make paint paper or paper with a print, paint with paints, add new parts. All your taste.


Angels from paper on the Christmas tree
What about the New Year Angels? You, too, remember how to do them? Angels can be made of golden paper or newspapers, coloring or adding sequins them.


Christmas cones from paper
What is the Christmas tree without cones? You can decorate the New Year tree with ordinary cones from the forest, but you can make your magic. There are several ways to make paper cones: it all depends on your preferences, free time and patience. The easiest option is a bump of old postcards.


You may be interested:

New Year holidays are approaching - time to give and get gifts, dress up and decorate the house. Perhaps we already do not believe in the good old man Santa Claus, do not expect gifts from him under the Christmas tree, but we definitely expect a miracle, especially on New Year's Eve. A miracle is certainly good, but the realities of life dictate our rules to us. Work, […]


Lace garland
The magic lamp can be created from a simple luminous garland, it will take only paper and small scissors with which you can easily cut lace snowflakes. Schemes for snowflakes you can find on the Internet or print so that after cutting figures on the office. In the hole cut in the snowflakes, you can push the light bulb from the garland, hang on the window or on the Christmas tree this garland will be very beautiful.

Lyfhak: If you do not have time cut lace snowflakes, or it is not possible to make them smooth and neat, purchase lace napkins in the supermarket, it will reduce the time of work, and the shopping wipes will look much more careful. Garland will create a bright New Year's mood. Boldly try to work!

See more ideas for garlands:

New Year is the most beloved holiday associated with wonders and magic. The celebration of the New Year's onset is characteristic of folk festivities and joyful meetings. It is impossible not to love this time of year, when everything is transformed around, and each house or shop window stores becomes similar to the scenery to the fairy tale. Everyone wish to participate in this transformation, and therefore try to decorate their homes [...]
Cardboard Santa Claus
You can diversify the decoration of your home and the Christmas tree with the help of snowflakes, floweries and lanterns, asterisks and balls, but how is the most important New Year's miracle - Santa Claus? From small cardboard sheds of frosts, you can create a fun garland, especially if you add different facial expressions to grandfathers.

To simplify work, you can find stencils to create toys that you just need to cut and glue.

New Year's house on the Christmas tree
You can decorate a Christmas tree with a paper house. It is especially great to such a toy if you put an electric candle or the garlands light bulb. Then the houses of the house will glow, as if someone lives in it. Dominics are made from paper very simple, you can do without a template. It will take paper or old postcards, scissors and glue.


Stars
You can decorate the Christmas tree with paper stars. They are done very simply, even kids will cope with such a task, but they look very original!


New Year or christmas wreath usually decorate the front door or hang it on the wall. But you can make a mini wreath of paper, which will be perfectly looked at the Christmas tree as a toy.

Toys that you have done for the holiday with your own hands - the key to the cozy atmosphere of the holiday. Happy New Year!
Help us become better: if you notice the error, select the fragment and click Ctrl + Enter..
Options, how to make Christmas decorations from paper for the new year, a lot, we tried to make an interesting selection of ideas and master classes. You will need only the fir-handed materials that will be in any house, any paper, a little patience and creative fantasy!


Balloons
The most common and universal toys for the New Year with their own hands - Christmas balls. You can make from any thick paper: color cardboard, motley postcards or old log covers. Single balls will give a single style room, and multicolored - the atmosphere of fun and fabulous magic.

So, before starting work on making Christmas paper toys, you need to prepare the following:
- tight paper with a pattern;
- scissors;
- pVA glue;
- circle or any object, out of the outset, which can be reproduced the circle (jars, covers, glasses, etc.).
How to do:
- Draw on paper 21 identical circle and cut them out with scissors.

Prepare circles as follows:
- bend the circle twice in half (it is necessary to define the center);
- sleash the circle and bend one of it so that the edge of the circle is exactly in the center;
- bend two sides of the mug to get a triangle with equal sides;
- cut the resulting triangle that will play the role of pamal for the rest of the details;
- overlay a triangle on the other mugs, blaming the pencil and bend the edges outside along the lines.
- 10 circles glue between themselves with two sides in such a way that it turns out a strip: 5 circles from above, and 5 - bottom. Striped must be glued into the ring. It will be the basis for the ball.

- Divide the 10 remaining parts by 5 pieces that glue into the circle. Two "lid" turned out.

- The top and bottom "lid" are consistently glued to the base.
- The loop, for which the ball is suspended, can be made from the thread, it will be threaded through the top of the toys with a needle, or from a beautiful ribbon. The loop of the ribbon is fixed by a nodule and is done through the top of the "lid" of the ball before sticking it to the base. The nodule remains inside the toy, and the loop is outside.
Original paper toy with your own hands for a new coming year is ready!
Paper Balls
Making such Christmas balls is so simple that there is even no sense to describe in detail - see pictures below. Success secret: Pleasant coloring paper and decorative beads for finishing.


Snowflake
Another indispensable attribute of the new year is snowflakes. They can be the most simple, carved from the paper sheet with an arbitrary pattern, and may be voluminous in the Origami technique. We propose to make your own hands the last version of the New Year's snowflakes.

To do this, cut six squares of the same size, folded each of them diagonally, and then in half. In the collapse, parallel cuts are made. The square unfolds, the internal tongues wrap up and fasten together.
External petals are connected to the same petals of the remaining squares. You can clutch them both with the help of glue and a conventional stapler.
Candy paper on the Christmas tree
This decor is available in making even kids. How well to create a New Year's mood with children who did it - knows what I mean :)

Many ideas and master classes on paper candies for the holiday with their own hands.
Cubes with photos
Original and memorable toys for the New Year holiday will turn out of paper cubes with photos of family members or the events of the past year.
Moreover, such Christmas toys can be mastered with their own hands every year, gluing the actual photo at the moment.
Thus, in a few years you will have a whole christmas photo album!

To form such a cube, you need to cut six identical circles from paper or squares. The edges of each element bended in such a way that a square was formed at the base. Then the bent edges are glued together between the rest of the details in the box. On the parties to the toys are pasted Favorite photos over the past year and invested looting.
Paper lanterns on the Christmas tree
I think, all in childhood did lanterns from paper. Old idea in a new embodiment:


More schemes and photos on paper lanterns.
Paper angels on the Christmas tree
What christmas without angels? Masthev for each house is easiest to do from paper:


Big selection of master classes with angels stencils.
By the way, it may be just angel wings, see how simple and beautiful:

Stencil, click to enlarge:

Magic garland
On the eve of the New Year, you can make an original magic lamp made of simple LED garlands. To do this, you just need to cut ordinary paper snowflakes with your own hands.

If you do not have time and desire to do this, you can buy lace napkins from paper in the store and use them as snowflakes.
It will only be left to turn the garlands light bulb through the finished snowflakes and hang the Christmas tree, a wall or window. Flickering of multicolored lights through intricate patterns will create a truly fabulous atmosphere of the new year.
Paper snowflakes on the Christmas tree
There is nothing new here, perhaps only advise you to try out of the paper.


Flowers made of paper on the Christmas tree
Good idea to diversify the decor. Why only snowflakes, balls and lanterns? Let's decorate the Christmas tree with flowers! Watch the photo below and inspire:


Paper sprockets on the Christmas tree
Star on the Christmas tree is a classic. Let's make it out of paper, and the pictures below will help evaluate the options:


Cardboard Santa Claus
Fun Christmas tree toys from paper are obtained using a small piece of cardboard, glue and marker. You can make any fabulous character for the new year, but the most relevant of them is Santa Claus.
The red square of the cardboard is folded with the tube and is fixed with glue. The top of the toys bends in the form of a triangle cap, the bottom is crumpled by a semicircle in the form of legs. A white triangle-beard is glued to the cap, a black felt-tip pen is drawn face. It will only be to secure the loop.
Similarly, you can perform a whole New Year party santa of frosts and decorate with them all the Christmas tree. (Click to enlarge the picture).
Such unusual toys with their own hands for the new advancing year will remain in memory of all households, especially the smallest.
Santas frosts from cones


Postcards New Year's
You did not forget? ? See in the video of simple and fast ways:
I liked the simple and stylish mailboxes from Kraft paper:
The new year brings a lot of fun and festive troubles. It always wants the winter holidays to be special, differed in originality and uniqueness. And most importantly, the chief of the place in each house was occupied by Christmas tree. For children and adults green beauties decorationit is one of the main attributes of the holiday. And since this case practically the whole family is engaged, then this lesson is becoming quite funny and interesting. It will also be very useful, including its creative abilities, make Christmas decorations on your own, introducing our children to this beneficial work. If you have never tried and do not know how to make toys on the Christmas tree with your own hands, then for the new year 2020 it is worth trying to try, because our article offers you 120 best photos of ideas that will not seem difficult to you in your performance and they are made from ordinary Things accessible to everyone. Useful wizards classes with phased instructions will help you in your work. Do not delay this creative lesson in the farbox, do it with your child today, because the holiday is not far off. Take care of patience, a little bother, manufacturing unusual toys with your own hands, and it will add joy and holiday in your home.
Variety of Christmas tree toys
If you decide to make the Christmas tree toys with your own hands for the new year 2020, then in front of you, of course, the question arose, and from which materials they should be performed. In fact, the choice is quite wide and amazes with its diversity. If you are a creative nature, then you just have to look at what kind of thing and the future Christmas decoration instantly wound in your head. For those who still experience difficulties in this process, you should still get acquainted with the list of auxiliary materials:
- paper (color and usual);
- cardboard (color);
- fabric (any type);
- dough (both salty and sweet);
- light bulbs (different shapes);
- foil;
- corrugated cardboard;
- covers (plastic and metal from - under beer);
- plastic bottles;
- silk ribbons;
- threads;
- yarn;
- cones;
- dried fruits, herbs and spices;
- pasta (also other types of croup);
- nuts (various varieties);
- styrofoam;
- foam;
- plywood and much more.
As you can see, make a toy on the Christmas tree with your own hands for the new year 2020 can be from all that you will like, and it will turn out the original and beautiful. Taken decorations will be able to perfectly transform all your home on New Year's Eve. And in order to expand your imagination, we provide you with our ideas photos as to which elegant ornamental things can be done for the holiday.
 Toy from cookies
  Toys from buttons
  Toy from thread
  Toy "Mittens" knitted
  Cardboard toys
  Toy from Macaron
  Toys from felt
  Toys from peanuts
  Wine Cork Toys
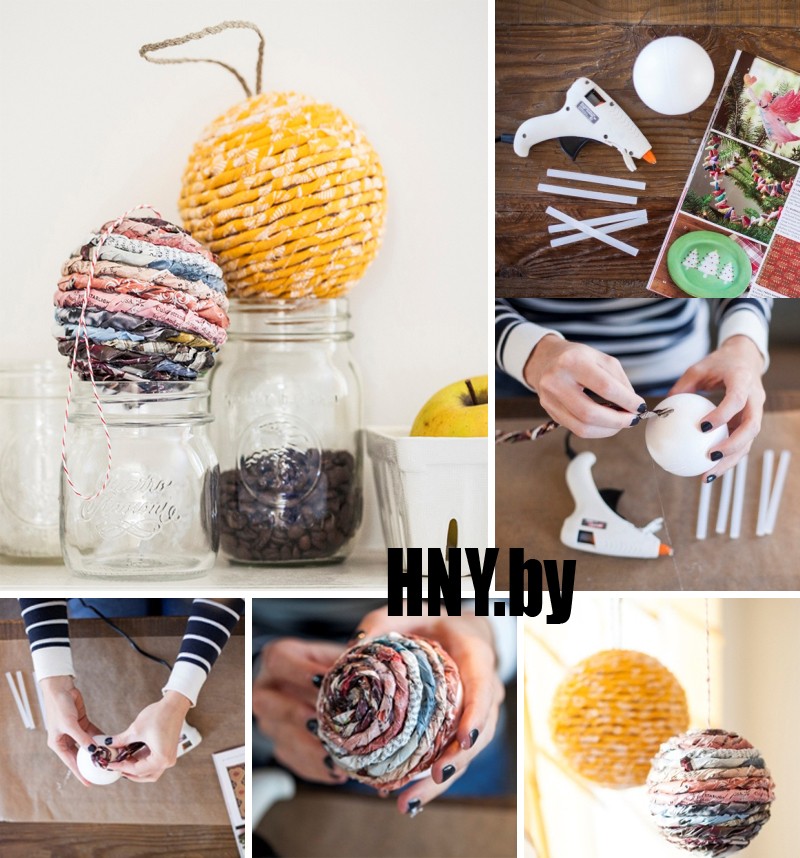
  Toy from newspaper and burlap
  Toys from Rakushki
  Silk Ribbons Toys
  Toy "Angel" from beads and beads
  Toy "Christmas tree" made of cinnamon, sprains ate and buttons
  Funduka toy
  Toy from tree
  Dried orange toy
  Plastic bottle toy
  Toy from light bulbs
  Toy made of cones
  Toy from Yaitz
  Toy from foil
  Toy from fabric
  Gypsum toys
Naturally, the creation of such Christmas toys takes a certain amount of time. If you do not particularly have them, then look at our video and learn how to make original decorations with your own hands in just 5 minutes.
Master class for the manufacture of Christmas tree toys in 5 minutes
Christmas tree toys from light bulbs

You can make a very beautiful decor on the Christmas tree with your own hands for the new year 2020 of ordinary burned light bulbs. A variety of toys amazes with its unusual and bright decorative species. Of course, it will take some time for their manufacture, but believe me, it is worth it. For this creative work, a number of auxiliary materials are also required, such as:
- light bulb (burnt or new);
- ethyl alcohol (for degreasing the surface of the light bulb);
- acrylic soil;
- foam sponge;
- glue for decoupage;
- new Year's napkin;
- brushes;
- contour glitter of different colors;
- sandpaper;
- silk tape or thread.
Progress:
- Before proceeding with the bulbs, it is necessary to treat it with ethyl alcohol, in order to degrease its surface and remove all sorts of contamination.
- After turning the light bulb, proceed to the surface of the surface by any acrylic soil, which is applied with a thin layer using a small foam sponge. If you use brushes in this work, it will leave a divorce that is not desirable in further decoration. When the primer process is completed, install the light bulb to some small jar, let's say, from under the vitamins, and let it dry carefully.
- After that, cover this product with a thin layer of acrylic paint, including the base. So that everything carefully fixed, you need to dry 30 minutes.
- Meanwhile it is worth deciding on the future pattern. You can simply paint the toy by making it various Christmas patterns on it, bright drawings, or, by decoupage, make a festive design. To do this, we will use a New Year's napkin, from which we have liked the inscriptions, pictures, pulling them off with your hands and fragments, attaching to the light bulb using glue for decoupage.
- The dried coating carefully look at no bubbles and folds. If this happened, then take sandpaper and polish all the irregularities, eliminating all kinds of defects.
- After careful processing, proceed to creating the appropriate background with your own hands, choosing winter themes or other drawings, which are relevant in this case.
- In order for the future toy to the Christmas tree as possible as possible and more colorful for the new year 2020, it is worth using some multicolor glitter, decorating them the contours of the existing inscriptions. After it is dry, the re-arched light will acquire a gentle overflowing shine.
- With the help of the same contour glitter, you can add point patterns, placing them all over the surface of the light bulb, draw snowflakes of different shapes and sizes.
- At the end of the painting process, we open the product with several layers of glossy acrylic varnish, in order to avoid damage to the drawings.
- The dried light is complete with the addition of silk ribbons to the base for further hanging on the Christmas tree. Ends fasten with hot glue so that there were no cumbersome knots. Optionally, it is possible to use the usual thread, which is wrapped around the base and fix acrylic varnish.
Such a toy on the Christmas tree for the new year 2020, made by your own hands, will excellently complement your room interior by making it unique and fabulous.
In order for you very easily able to figure it out in this creative process, we picked up your interesting video, watching which you will see what a miracle - decorations are born in the magic hands of the author.
Master class on the manufacture of New Year's toys on the Christmas tree of light bulbs
Christmas christmas balls

The most popular and beautiful toys on the Christmas tree for the new year 2020 are paper balls made by their own hands. There are many options for their manufacture and look quite elegantly and tempting. Such scenery can be decorated at least all your home. In this way, you will only emphasize your room interior on the eve of the New Year holidays. If you are not a specialist in making such paper scenery, it does not matter. At home, they are performed simply enough from colored paper or motley cardboard. We bring to your attention the simple variants of such works.
Rainbow Ball

In order to make such a toy on the Christmas tree for the new year 2020, it is necessary:
- dense colored paper with beautiful pattern;
- scissors;
- pVA glue;
- simple pencil;
- circle or any other item that can reproduce the circle.
Progress:
- On dense colored paper, draw 21 circle with a circulation and cut them with scissors.
- Ready mugs should be bent twice in half to find an accurate center.
- The edges of the circle bend it so that it turns out a triangle with clear corners and equal parties. Cut it and use as a pattern for subsequent circles.
- The resulting triangle we impose on the other circles and supply a pencil, bending the edges outside along the lines.
- 10 circles glue to each other to form a strip: out of 5 circles from above and 5 circles below. Stripes fix with plow glue into the ring. This will be our basis for the future decoration made by your own hands.
- The remaining 10 details are divided by 5 pieces and glue also in the circle. It turned out peculiar lids.
- The upper and lower cap is accompanied by our previously manufactured basis.
- The finished rainbow ball is supplemented with a loop, so that you can hang a new year toy on the Christmas tree. To do this, use PVA glue.
Such a decoration made by your own hands will become interesting for all your relatives and guests who came to you for the New Year 2019. But that you do not get confused during the work, we offer to view our videos in which you will be able to familiarize yourself with a similar product performed. White thick paper.
Master class on making a ball of thick paper
Ball of paper circles

For the new year 2020, you can decorate the Christmas tree with unusual toys that can be easily done at home with your own hands from colored paper circles. These multi-colored balls are performed quite easily, they do not require something supernatural for their manufacture. Total sheets of colored paper, glue and dexterity of your hands. Let's proceed immediately to creative work.
To do this, we need:
- colored paper - 3 sheets (double-sided);
- scissors;
- pVA glue.
Progress:
- By choosing two-sided multicolored paper to your taste, cut out 12 circles from it, 4 each color.
- Each circle after this must be folded in half and, doing such a preparatory work, you follow the bent steps to fold into the stack.
- The resulting stack of bent circles straighten and connect the stapler along the fold line. After that, you need to give the volume of the future New Year's toy, straightening every part of it.
- Between itself, it is necessary to connect with the help of GWE glue all the upper parts of the circles with the previous ones and the lower consolidation with the subsequent. Our ball is ready!
It will be very beautiful to look at the Christmas tree toy made by hand for the new year 2020, in the form of a flower bowl, made in the Japanese origami technique - Kusudam. After reviewing our video, you will see for yourself, and what is even better, this is the possibility of performing such a wonder on their own.
Master class on the manufacture of colored paper floral ball in Japanese origami technique
Zd ball of colored paper

This is the easiest option of the festive decoration on the Christmas tree made by your own hands for the new year 2020. For the manufacture of such toys you will need glue and sheets of colored paper, as well as some of your patience.
For work it is necessary:
- sheets of colored paper;
- scotch;
- scissors;
- stationery knife.
Progress:
- From double-sided colored paper, cut 12 flowers with five petals. The size is chosen for your taste.
- The resulting paper flowers to fold into the stack and the stationery knife to make small cuts in the place of connecting the petal and the middle. The size of the cuts must correspond to half the petal, and should only be done in one particular direction.
- To attach the lace to the inside of the flower, you need to pierce it in the center and stretch into it you have chosen the rope, tie to the knot and secure a piece of scotch. It will be the inside of our New Year's ball with you.
- We will not glue the details of the colors among themselves. We take two flower and connect them with petals with the help of us earlier. Then we join this way the third flower and all the next. Ultimately, the resulting design gently bonded among themselves so that the 3D flower turned out. That's all! An elegant decor on the Christmas tree, made by their own hands for the new year 2020, is made. Create such toys as much as possible your pine tree look brighter and richer.
Master class on the manufacture of 3d bowl of colored paper
Christmas tree decorations

With such natural material it is very convenient to work. From the cones you can make it yourself very beautiful crafts on the Christmas tree for the new year 2020. If you need to open a bump to work, hold it a few minutes over boiling water. It should straighten your scales, and if you want it to be left not opened, then sprinkle a bump with hair varnish. The easiest way to make a New Year's toy from this material is to arrange a cone "Inite" or "Snow". For "Inea" you need the usual kitchen salt and water. Water must boil, put in it a large amount of salt and stir well. In such a solution, it is necessary to lower a spruce twig or a bump, hold a few seconds, and then take out and leave to climb for a while. As the twigs are dried, they will cover "Inem". "Snow" can be made from conventional foam. Stit it on the grater. A bump, a twig or any other Christmas decoration to squeeze glue, and on top neatly pour the prepared foam.
Star from cones

Available for all ways you can make an excellent toy on the Christmas tree with your own hands for the new year 2020 of the beautiful selected cones in the form of a star. At home, its manufacture is quite simple.
For work it will be necessary:
- cones of different sizes and shapes;
- sturdy wire;
- multicolored ribbons;
- pliers.
Progress:
- The main thing that needs to be done at the beginning of this work is the metallic basis consisting of small iron spots, on which our decoration will be attached. Five wire strips of the same size combine in the center, burning with each other. During the work, a five-way star layout is obtained. In order for our toy to be able to turn on the Christmas tree to the New Year 2020, it is necessary to make an eye on one of the metal plutics and in the future stretch through it a ribbon.
- After the preparatory work done, it is worth riding the existing cones on the rods of a five-pointed layout, alternating, as desired, small with large. That's ready!
An asterisk made of cones made with their own hands can be of different shapes and sizes. It all depends on what size you build a metal layout. If, let's say this product is manufactured as a decor of a class at school or the group in kindergarten, then the size, of course, plays an important role. The greater the toy, the more solid and clearer, it will look at the windows and on the ceiling. Fantasize and create New Year's masterpieces yourself, thereby raising the festive mood for yourself and your loved ones.
Bowl of cones

Such natural material as a bump is wide in its use and application. Suppose you can make a gorgeous filler on the Christmas tree with your own hands for the new year 2020 in the form of a large or middle bowl, reorganized, besides cones, dry berries of ostolist, beads, multicolored stones, complemented by bows and motley ribbons. Working with similar toys, you will not spend the time. The result will amaze not only you, but also your relatives.
For work it will be necessary:
- cones;
- balloons;
- multicolored ribbons;
- acrylic paint (any color);
- toilet paper;
- pVA glue;
- water;
- hot glue;
- decor elements: Christmas balls, beads, rhinestones, multicolored peas, bows, ribbons, and so on.
Progress:
- At the beginning of our work, we prepare the basis of the future product. To do this, take a balloon, inflated to the desired size, and wind by toilet paper, pre-moistened with water and PVA glue (2: 1). Leave the ball dry out the day.
- After drying, we like our acrylic paint, the color you like to have no clearance to be seen. Leave to dry again.
- We proceed to the scenery of the dried basics: we take selected clean cones and gently glue them to the ball, not leaving any intervals if possible. We supplement them with small-sized christmas balls, beads, rhinestones attached to the product with hot glue, bows.
- We complete our work with the attachment of a silk bright ribbon to the toy so that you can hang it on the Christmas tree for the new year 2020.
Such an interesting decorative thing made with your own hands will excellently issue your home in New Year's Eve, will make it truly unsurpassed. If you wish to make Christmas decorations from cones very quickly, then look at our video lesson.
Master class on rapid making toys on the Christmas tree made of cones in Kanzashi style
Pay attention to our selection of photos of ideas that will expand your imagination about the toys on the Christmas tree from such a natural material like a bump. Decorate your holiday, because their manufacturing technique is pretty simple.


Christmas christmas decorations

Very original decorations on the Christmas tree, made by their own hands for the new year 2020 of the egg shell. First select the egg. Well wash it and dry. At both ends, with a big needle, make small holes. Through these holes, you need to blow all the contents of the egg in some kind of dishes. After that, the empty shell is very well wooered under running water, dry. Shell is ready to work. From such a workpiece you can make funny little men or unusual animals. For this, colored paper or plasticine is used. From paper sheets, you can cut, for example, such elements: eyes, mouth and hat, handles and legs. Printed them with glue. With plasticine, it is much easier to work. Especially it likes the kids. Children's fantasy is always unpredictable. Therefore, all toys of this kind will be exclusive and unique. Very beautiful is a decorative decoration from the shell, if you take a clean, dry blank to paint or the most conventional wovers. Drawings with festive elements can be supplemented with glittered brilliant tinsel or beads.
To make a new year toy on the Christmas tree on the New Year 2020 for the new year at home, it is necessary to get acquainted with our selection of photos of ideas that will serve as a source of inspiration in this creative work.


Master class on making toys on the Christmas tree with her hands from eggs
Christmas decorations from walnuts

Who would have thought that the walnut's usual walnut can become an excellent decorative decoration for the new year 2020. And indeed, if you remove the contents from the nut and glue the empty shells together with hot glue, paint acrylic paint, let's say gold, checkout you liked you Elements of the New Year decor: beads, rhinestones, ribbons and many others, or to draw funny funny drawings, all sorts of festive patterns, secure the silk ribbon, you can ultimately make an unusual toy on the Christmas tree with your own hands. You can also with children's plasticine or colored paper make a variety of features of animals or birds.
To show you how it is worth working with walnuts, turning them into real art, let's do the simplest Christmas decoration as an example.
To work you will need:
- nuts;
- satin tape;
- glue "moment";
- beads of various shapes and textures;
- needle with a big ear;
- acrylic paint;
- tassel.
Progress:
- Nuts should be prepared, the splits of them and stretching the kernel.
- Satin tape we do the desired size, fold it in half and tips by fixing the node. We ride the beads you like, omitting them to the node itself.
- Two halves of walnut purified walnut lubricate a small amount of "moment" glue and put a satin tape on one of them so that the node hides in the middle, and after tightly clamp his hands to make the product.
- After the walnut stuck, we proceed to its external decoration. We take any color acrylic paint and cover her our product. When it dries, you have the right to add something your, transforming and significantly reviving the resulting toy on the Christmas tree, so that for the new year 2020 it has become the subject of universal discussion among your guests and relatives.
In general, if your fantasy is rich, then you will create your own hands the present New Year's miracle. And those who need minor assistance in this creative process, we provide you with our most interesting photos of the idea.


Do not forget to familiarize yourself with our video lesson who will become your assistant in a difficult moment.
Master class on making toys on the Christmas tree from walnuts
Christmas tree decorations

In order to make simple and at the same time, original crafts for the Christmas tree with their own hands for the new year 2020, it is necessary to take advantage of the old and efficient method - this is the manufacture of toys from salt dough. They probably used our grandmothers yet. The main thing is to make the dough correctly. To do this, take flour and salt in the same proportions, add a small amount of water and knead the dough. It should be sufficiently dense consistency and remind plasticine or clay with its appearance. From this material you need to make our New Year's christmas decor. So the dough is quickly freezing, so it is impossible to slow work. To connect pieces of future toys from this material, use conventional water. To do this, fragments of crafts are a little bit into the liquid, attach to each other and hold so for a few seconds. The finished figurine needs to be left to full pouring. When the form of the workpiece is solid, you can start apart. Best of all on the salty dough there is an ordinary gouache. Draw a figure at your own discretion and leave in the room until complete drying.
Toy on the Christmas tree "Santa Claus" from salt dough

If you are new to this case, then let's together with a Christmas tree toy in the form of Santa Claus from a salt dough. It will be a wonderful and fairly relevant handicraft on the Christmas tree for the new year 2020, made by hand.
For work it will be necessary:
- flour - 300 gr.;
- small salt - 300 gr.;
- water - 200 gr.;
- gouache;
- acrylic lacquer;
- ribbon;
- starch - 1 tbsp. l.
Progress:
- By connecting all the ingredients, knead the thick nelite dough. After that, we shift it into a plastic bag and put in the refrigerator for 2 hours.
- Cooling dough put on the table and roll in the reservoir. If there are special forms, then sout out Santa Claus, and if not, then we do as in the photo.
- The finished product is enjoying in the warm room, making the pre-hole with a tube for cocktails to turn in the following ribbon.
- The dried product is painted with a gouache, and after dried, cover with acrylic varnish.
Such an interesting toy on the Christmas tree for the new year 2020 will become an excellent decor for your home. As an example, we give you our selection of photos of ideas, with which you can create your own hands - then your original.


Browse our video, which presents a few more ideas on this topic.
Master class on making toys on a Christmas tree made of salt dough
New Year's ball - Pautinc

If you still do not know how to make decorations on the Christmas tree with your own hands, and the new year 2020 is no longer around the corner, then we advise you to build a ball - a cobweb of threads and an ordinary ball. This toy is manufactured at home quite easily and simply, without requiring any extra financial costs and efforts. It is necessary only to be patient and preferably.
For manufacture, you will need:
- air balloons;
- yarn (any quality and type);
- pVA glue;
- scissors;
- petrolatum;
- any deep container.
Progress:
- We take balls and influence them to the desired size and tie them with threads.
- We dissolve PVA glue with water in a 3: 1 ratio in deep containers and, by grabbing the required amount of yarn, dip it into the resulting adhesive solution, leaving for 5 minutes.
- Before starting work, smear the ball by vaseline, and then we wrap our yarn on it, elongated from the adhesive solution, gradually increasing the density. The ball should be like its appearance on a kind of cocoon.
- At the end of this work, the thread is consolidated to the finished product of PVA glue, so as not to operate. Write to dry about a day or a little more.
- After the required time, the ball is unleashed to be blown away, and carefully remove from the threaded cocoon.
- We take the rope you like and tie it on the resulting New Year's toy as a fastening on the Christmas tree. We decorate your taste: rhinestones, beads, decorative pebbles, bows and other elements of the decor.
Such an original product made by your own hands will become an excellent Christmas tree decoration for the new year 2020 both at school and in kindergarten. It is not necessary to make balls from threads, you can, if you want so much, create a snowman, bullfight, various animals and much more, it all depends on your imagination. The most important thing is that this unusual miracle - the products will not exactly have anyone, and if the school exhibition is planned, then be sure, admiring eyes will rush to this New Year exhibit. And to make everything right, we picked up you a useful learning video that will quickly allow all your questions about this work.
Master Class on the manufacture of a ball - Clappers from threads
Christmas decorations from beads
 If you do not know what to make crafts on the Christmas tree for the new year 2020 do it yourself, then use the idea of \u200b\u200bcreating Christmas tree toys from beads. They are enough just to perform at home with a thin wire and a bright shiny bead, a decorative ribbon, as well as your rich imagination. But, if you have never worked with beads, then let's start with the simplest.
House of Beaded

The flat house of beads is the easiest option of weaving that is suitable for beginners. The manufacture of this New Year's crafts on the Christmas tree for the new year 2020 leaves a little time. It is only necessary to be patient and the gorgeous toy will have in your hands.
For work it is necessary:
- beads of different colors;
- thin wire;
- satin ribbon.
Progress:
- Starting a weaving stands with a house of a house. To do this, you need to take a thin wire, the size of eighty centimeters and secure in the midst of three beads of the color you choose.
- Next, you should ride three more bispers on the right side of the wire, and the left goes to beads in the second row in the opposite direction. After that, the weaving process is tightened.
- Further weaving goes into the roof of the house, which begins with the third line. We repeat the previous actions and ride on the tip on the right side - eight, with left - six beads.
- The fourth line consists of eighteen elements. The left wire passes through eighteen beads in the opposite direction, and the next fifth line is formed, like the fourth of twenty beads. The sixth row is twenty two beads.
- The walls of the house are created by seventh and eighth rows. For this, the beads of a monophonic color are used, the number of which should be twenty units.
- Window and doorways are created from the ninth and on the eighteenth rows with the help of twenty beads each. Bead's color can be selected according to the proposed scheme, which will be presented to you slightly lower or at your discretion.
- We finish the work by twisting the wire on the borders of the crafts into two lines, not forgetting to attach the satin ribbon. Ready!
Such an exercise on the Christmas tree made by hand for the new year 2019 will become an excellent decoration for your tree. To make it easy to make such a festive toy, follow the proposed scheme.

We offer to watch a video lesson who will help you in the technique of weaving beads.
Master class on making snowflakes from beads with their own hands
As you have already seen, the toys of beads on the Christmas tree are an excellent addition. For the new year 2020, such decorative decorations will become interesting for all of your guests, especially children. Check out our useful selection of photos of ideas on this topic and your ability to significantly expand in this area.


