Master class crafts from paper "Doggy. Card with dog do-it-yourself postcard dog dog with moving tongue and ears
Oksana Telikova
Good day to everyone who found time to look at me on the light!
I want to devote this entry symbol of the coming 2018!
Dog - The symbol is responsible and friendly. It is believed that bane will come with her, inner peace and order.
From last year's Publications, you can remember how to make christmas toys - doggy.

Implementing a minute of free time, began to pre-year preparation, much later than usual! Beginning from manufacture postcards. Today I suggest you look at what I got.
To work to me we needed:
* Linen fabric;
* glue "moment";
* scissors;
* Acrylic and gouache paints;
* Brush pony №2;
* Background for postcards, you can remove wallpaper;
* curly scissors;
* Different decorative supplements: Satin ribbons, braid, buttons, beads, snowflakes, bubber
how worley:
Brought the silhouette of the silhouette like doggy.
Cut and pasted on linen cloth.

Cut on the contour. This is the most difficult stage of work, in my opinion)


Denotained the contour with brown guashi.

Drawn ear sink, eyes, nose. To the nose glitter and looked naturally, he painted his black nail polish.


I picked up the paper for the background and cut the rectangles with figured scissors.

Then followed the most interesting and pleasant part of the work.
Each snatch surround the beauty)


Time for the manufacture has gone quite a bit! And I also experienced pleasure, and hopefully recipients postcards) It remains only to enter good words of wishes!

I wish you all the raised pre-New Year mood!
Publications on the topic:
 Want to give handmade postcard, International Women's Day? I propose to your attention Master - Classroom Classroom Class.
 Master Class. Postcard for mother's day. Good evening! On the eve of the holiday, the mother's day I want to offer a simple postcard to this wonderful one.
 A gift to your own hands is pleased to get any parent, grandparents from your child. Today we will show you the master class gift.
A postcard veteran dedicated to the 72th anniversary of the victory made by its own hands. "Nothing is forgotten, no one is forgotten" Description: This.
 Greeting card "I will give a flower mom" in the technique of a volumetric applique. Children's master class Necessary materials and tools:.
May 9 is not just a holiday, it is one of the great days, revered not only in Russia, but in many other victims of the invaders.
If a child makes a card with a dog with his own hands - she will be a wonderful and memorable gift that can be coincided with any holiday. And then, depending on the celebration, the postcard can be decorated with any decor, stickers, paper figures, drawings.
Materials for work:
- Double-sided color cardboard: one shade for the cover, any desired for the body and a little bit darker for the ears, paws, frills. Red paper or cardboard for language;
- Black felt-tip pen, simple pencil, scissors, adhesive pencil;
- Different decor, curly composter for creating paper decorations postcards, etc.
Card with a dog with your own hands step by step
Preparation
Use the template and cut out of the color cardboard of the dog blank:
- Rear paws with tail;
- Torso with front paws;
- Head;
- Muzzle;
- From Dark Cardboard you can still cut blanks along the contour of the tips of the paws, or skip this moment and paint in that region of the felt-tip pen.


Stick small billets on the tips of the paws or sketch them with a felt-tip pen. On the paper circle on the sides of the ears, the front - muzzle and tongue. Flomster or marker Draw your eyes, nose, points and line on the muzzle.

Make bends on dotted lines. On the torso, these are the tips of the paws, in the middle and a small strip with a narrow side. On the hind legs only tips.

Completion
Now it's time to make a cardboard for a postcard from cardboard. To do this, cut a rectangle, taking into account the size of the dog, and fold it in half.

Enclose the back of the dog, where the tail area on one side of the cover, and the tips of the legs on the other. The glue should be applied to the entire workpiece and fully glued it, repeating in the lap area the outline of the bend.

Now glue the torso with front paws. The glue is applied to a thin bend strip along the edge and on the paws. First glue the strip, close the postcard, and only after sticking the paws. If you do this without closing the postcard, if the risk of sticking too far and the postcard will subsequently cut and so.

At the end, glue the head in front of the head slightly and the opening 3D card with a dog with your own hands is ready. Decorate it inside and outside, considering the event, in honor of which the postcard will be presented.
Beautiful New Year cards made by their own hands are suitable for congratulating all friends and acquaintances. In school and kindergarten, children make them for mothers, dad, grandmothers. But both teenagers, adults can make such cool crafts that will surprise everyone being beloved. For example, congratulatory cards can be made from designer colored paper and cardboard. You can add a postcard with cuttings for scrapbooking in the form of a symbol of the upcoming year - a dog. With the help of the workmen proposed below with photos and the video, it will not be found unusual and magical crafts that can be done and a child and a teenager. At the same time, each such postcard for the new year 2018 is made with their own hands really easily and simple.
Bright scrapbooking card for the new year 2018 do-it-yourself - master classes with photos and videos

Bonding postcards in the technique of scrapbooking takes at least time and enjoy any child. And using the master classes offered below with photos and videos, you can find out how to make such crafts easily and simple. With them a beautiful scrapbooking card for the new 2018 year 2018 can be made with your own hands literally in 1 hour.
Materials for self-making New Year's postcard in the technique of scrapbooking
- set of cuts for scrapbooking in the form of leaves and colors, bells;
- figured frame;
- tight paper sheet;
- markers;
- salad paint;
- glue.
Stock Foto Master class manufacturing with their own hands scrapbooking postcards in honor of the new 2018

- To spray a salad paint and apply paper for a postcard to it.

- Wait to dry off the sheet.

- Glue the frame to the background sheet.

- In print in a congratulatory inscription.

- Coloring the inscription in the frame. Glue the frames in the top of flowers and leaves, bells.

- Decorate the bottom of the frame.

- Optionally, congratulatory poems can be glued to the back of the postcard.

Master class with video manufacturing with your own hands postcards in the technique scrapbooking to the new year 2018
The next simple instruction will tell another way of making scrapbooking postcards for the holiday of New 2018. Optionally, individual cuts for it can be replaced or supposed to be more interesting and easy to use.
Cute postcard for the new year 2018, made by hand with children - master class with photo

The use of unusual materials in the manufacture of greeting cards will certainly like the child who is studying in kindergarten or school. For example, kids can work not only with paper, but also buttons, volumetric decor. With the help of the next workshop with the photo, you can find out how your own hands make a postcard for the new 2018 from colored paper cardboard and additional materials along with children.
List of materials for independent creation postcard in honor of the new year 2018 with kids
- green and white paper;
- white cardboard;
- silicone glue;
- a set of green buttons;
- figure hole "Snowflake";
- brush;
- wooden asterisk.
Photo instruction managing new year postcard 2018 with their own hands
- Cut from green paper triangle.

- Apply silicone glue using a triangle tassel.

- Glue green buttons of different sizes to the triangle.

- From white paper, making small snowflakes with a hole punch.

- Cut a rectangle under the size of a button Christmas tree made of white cardboard. Glue a stylized Christmas tree, snowflakes and a wooden sprocket to the cardboard.

How to draw a postcard for the new year 2018 do it yourself - a step-by-step master class

Drawing postcards at home - excellent lesson on the eve of the New Year 2018 holiday. Using simple instructions, children will be able to prepare gifts for all friends and acquaintances. Also proposed photo lesson is suitable for the manufacture of New Year's crafts at school, kindergarten. In the following master class, step by step is indicated how you can draw the simplest postcard to the new 2018 with your own hands using only three colors of paint. At will, such a crawler can be painted with other colors that like a child.
List of materials for drawing with your own hands Cards to New 2018
- paper for watercolor (embossed);
- blue, red and blue paint;
- tassels;
- christmas tree stencils;
- eraser.
Step-by-step photos on a master class for drawing a New Year's postcard by 2018 do it yourself

Beautiful postcard-dog symbol of the year for the new year 2018 do it yourself - video instructions

The next master class is great for school and kindergarten: it will be able to make a cool card in the shape of a dog. A pretty and simple handicraft can be complemented by a brilliant decor, inscriptions with wishes. Learn more about how to make a new year-old dog card with a symbol of the year with your own hands, in the next simple instruction.
Step-by-step master class with video manufacturing cards in the form of a dog to the new year 2018 do it yourself
The proposed master class can not be repeated, but also use as a basis for the manufacture of different postcards. For example, according to the specified instruction, the symbol of the upcoming year can be complemented with decorations, new year accessories or clothing.
The original postcard for the new year 2018 do it yourself with a dog - a step-by-step photo

To make a dog - the symbol of the upcoming year was able to decorate each house, it is recommended for a gift friend and friends to make greeting cards with this animal. To work on a cradle, it will not be necessary to spend a lot of time, you only need to prepare the required materials in advance. The basis will be a cardboard, sewing supplies will be used as a decor. With them, a card with a dog to the new year 2018 will be made with your own hands and easily, and quite quickly.
Materials for self-making original postcard with a dog to New 2018
- cardboard sheet;
- gel black and red handle;
- copy paper;
- bulk braid;
- color Relief Cardboard;
- double sided tape;
- buttons or "droplets" for decoration of clothes;
- silicone glue.
Photo-lesson on the workshop of the making card with a dog with his own hands for the new year 2018
- Prepare materials for work.

- Draw a dog on a draft sheet of paper, and then translate the drawing using a copy of the copy to a white piece of cardboard.

- Dog contour Draw a black gel pen. The internal part of the figure fill in small circles.

- Cut the bow on the neck and for a similar scheme to fill in red circles.
- Printed double-sided adhesion to white cardboard and glue it with color cardboard.

- On the contour of a white piece of cardboard, glue a bulk braid.

- In the corners of the picture to glue buttons or decor for clothing.

Simple cardboard and cardboard cards for the new year with your own hands - master class with photo

To please the educators in kindergarten and teachers at school before the holiday of the new 2018 will help the postcards made by their favorite disciples. They can be done using colorful paper, bright cardboard, add brilliant decor. At the request of the kids can enter their congratulations inside or glue the leaflets with printed verses. With the help of the next master class with a photo, you can find out how to make a card from paper and cardboard with your own hands for the new year in just half an hour.
Materials for the manufacture of paper postcard with their own hands in honor of the new year
- cream and green paper;
- brown cardboard;
- scotch;
- glue;
- sequins and sequins.
Stock Foto Master class for making christmas paper card with their own hands
- Folding cream paper sheets in half to make the basis of postcards. From green paper cut chips, fold them in half.

- Glit adhesion to the inside of the Christmas tree so that it keeps the specified volumetric form.

- From brown cardboard make a "harmonic" and cut a small piece from it - the trunk of the Christmas tree.

- Glue the barrel to Christmas tree.

- Print ready-made Christmas tree to postcards, decorate sequins and sequins.

Unusual postcard for the new year with your own hands with children step by step - master class with photo

Original crafts for the new year can be made not only creating them from scratch, but also using old pictures and postcards. Admired postcards Children can do in kindergarten or at school, and can make together with parents at home. In the next instructions with the photo, you can find out how to just create a new greeting picture, working with applications. A simple master class will help with their own hands step by step to create an unusual and cute postcard for the new year along with children.
List of materials for step-by-step manufacture with children of New Year's postcard do it yourself
- old postcard with bird;
- cone;
- ordinary glue and glitter glue;
- cardboard;
- scissors;
- white and red paper.
Photo instructions for independent creation of an unusual postcard in honor of the new year with the child
- Cut from an old card figurine birds.

- Felt a bump on separate pieces.

- Glue a piece of red paper to white cardboard, slightly smaller in size. Top to glue the bird on the paper and start gluing pieces of cones.

- Parts of the bumps will imitate a twig.

- Glit a piece of paper with a congratulatory inscription.

- Decorate the crafts of sequins.

Top postcard for the new year with your own hands - photo master class for children

For rapid and simple preparations for the new year and congratulations to their parents, brothers and sisters, the smallest craftsmen should offer the indicated instructions below. It can also be used in elementary school, and in kindergarten, because it makes it easy to make a pretty craft from paper and magazines. In the next workshop, it is indicated how to make a postcard for the new year by small children.
List of materials for the manufacture of children's postcard with their own New Year's holiday
- 2 sheets of white paper;
- tenderloin of old newspapers;
- shiny paper;
- glue;
- scissors;
- pencil.
Photo class on the master class of making children of the New Year's postcard do it yourself

How to draw a postcard for the new year with your own hands - master class with photo

Not only children's, but adult crafts for the new year can be a beautiful gift for loved ones. For example, using the following instructions, even adolescents will be able to make an amazing card with congratulations. Step-by-step master class will tell how to draw its bright postcard to the new 2018 to give his family and friends.
List of materials for drawing with your own hands of a New Year card
- paints;
- sequins markers;
- pencil;
- black gel pen;
- corrector;
- paper.
Stock Foto Master class drawing postcard in honor of the new year do it yourself
- On a piece of paper, draw a pencil Christmas tree, winter hat and snow, congratulatory inscription.

- Coloring the Christmas tree and give dry picture.

- With the help of a corrector to draw garlands on the Christmas trees.

- Coloring the header.

- Take a black handle greeting inscription and patterns.

- Golden marker draw a sprocket in the picture.

- Draw snow and supplement the picture by sparkles.

Which one can make a postcard for the new year Mom and Grandma - a step-by-step master class

Radiating relatives and loved ones and give them a magic craft to help teenagers and children next master class. It will show what a beautiful postcard with short sparkles can be made for the new year Mom and Grandma. Work should be carried out very carefully and step by step to check that all actions are fulfilled correctly. Then the finished postcard will certainly succeed, the same as in the photo example.
Materials for making a congratulatory New Year's postcard mom and grandmother
- white and turquoise cardboard;
- scissors;
- glue;
- sequins;
- protective glass for phone;
- thin and thick bilateral scotch;
- small beads.
Master class with photos of gluing cards for mom and grandmother for the holiday of the new year
- Make a double frame from turquoise cardboard (one slightly comes from another).

- A thin tassel with the help of glue to write a congratulation and sprinkle it with a glitter.

- Excess glitter smoke.

- Sweep glue with a hairdryer.

- Cut a picture with trees, draw it or make a stamp on the template.

- Cut a piece of protective glass for the phone is slightly smaller in size than the picture frame.

- Glue the glass on the glass on a thin double-sided tape.

- Plug clipped on the frame around the perimeter with thick bilateral scotch.

- Pour in the picture beads.

- From above, close the picture with glass.

- Glue the finished composition on white cardboard.

With the proposed master classes for children in kindergarten and school, adolescents you can find many options for amazing New Year's crafts. It can be like gift products for mom, dad, grannies of paper and cardboard and congratulatory applications, scrapbooking crafts. At the same time, each discovered postcard for the New Year 2018 can be made very quickly and simply. It is only necessary to carefully examine step-by-step instructions with photos and videos, prepare the materials required for work and proceed to the manufacture of crafts.
Postcards do it yourself 2018 You can start doing long before the new year itself, because in the world there is a huge variety of handmade technician - you need a lot of time to try only some of them. But as a result of the Labor, you will have excellent greeting cards for all relatives and friends.
Postcard for 2018 do-it-yourself
An excellent designer version you can get with a minimal set of materials. First of all, you need to think about the size of the finished product - it should be noted that the most attractive will be exactly a small snience. Take a yellow paper rectangle with a size of 15 by 20 cm, bend it in half.The edges of the details are made by a decorative ribbon - it is best to choose a contrasting and meeting the topics.
Take a green corrugation and cut a couple of triangles, one should be more than the second. Dismiss in half a wand from ice cream and glue as trunks on the back of the Christmas tree. Place the insertion of a small shower of Sinytender, which will play the role of a snowy snowdrift, placing the Christmas tree behind it.
Write warm words of wishes on a separate paper piece. You can print a congratulation if you wish to use any particularly beautiful font. The boundaries of the details be stuck with strokes - it will look even more effectory.
The final stage of manufacture will be gluing, they can be attached in an arbitrary order.
Postcard with your own hands for the new 2018 year
Each will be very pleasant to get as a gift with Christmas tree, but it is not done at all. It's not so difficult, as it might seem when looking at the photo.
Cut green paper rectangles - the narrower, middle and widest, while the length length should be identical. Fold them with harmonic windows on the short side. On the long side of the pressure to fold the white sheet to get a card base.
Lubricate the end and the beginning at the smallest harmonica itself, open the white sheet and put the harmonica to the inner collar on the right. Similar manipulations do with the rest of the accordion, having them ascending in the center and left. As a result, a bulk tree should turn out.
To decorate crafts cut paper parts - a pair of red balls and an asterisk, as well as blue, yellow and orange balls. The asterisk sticks, of course, on the top, and balls - in chaotic order. So, new Year's postcard do it yourself for 2018 Almost ready, it remains only to add congratulations - for this purpose, pencils, markers or color handles can be used to choose from.
Postcard for the new year 2018 do it yourself
Scrapbooking technique is ideal for the manufacture of posts - as a result, just masterpieces are obtained. Be sure to try and you are guided by photo tips and everything will certainly come out as needed. The boot card looks very original, its manufacture will not be rapid, but the result is worth it.To work, you will need to use a boot pattern - attach it to watercolor paper, circle and cut two bases.
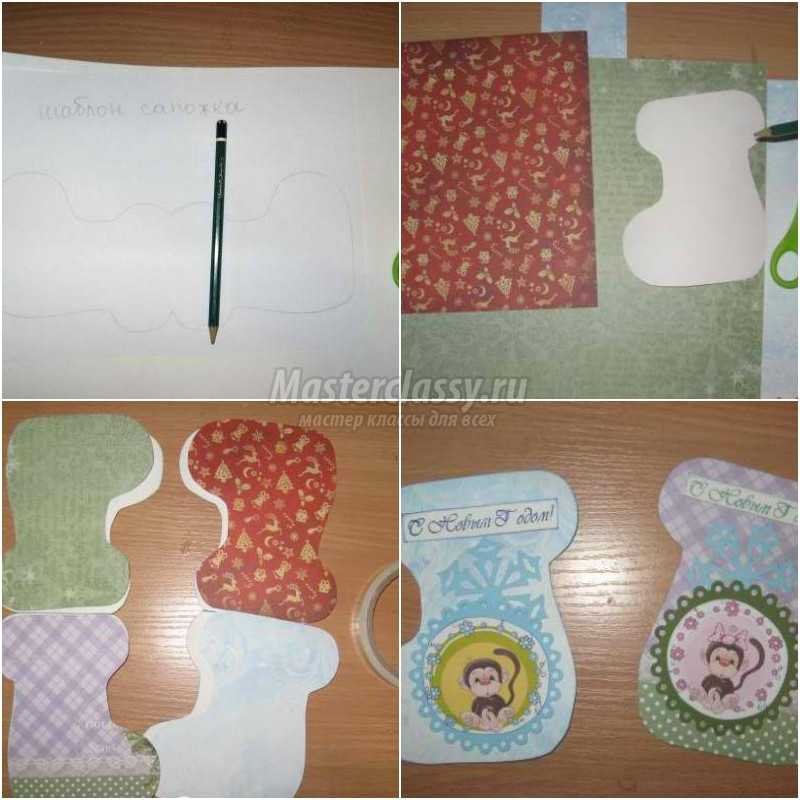
Front items must be decorated with stamps, pictures and scenery. First of all, spend the pictures with pads on the edge, then glue with a pencil with a cut-down circles of green and blue. In the master class in the pictures, funny monkeys are depicted, but since you seize postcard symbol 2018 do it yourselfYou should find pictures of dogs. Stick also on a large blue snowfall from cutting down, and at the top - a pre-toned inscription "Happy New Year!". Inscriptions and pictures. Send a typewriter.
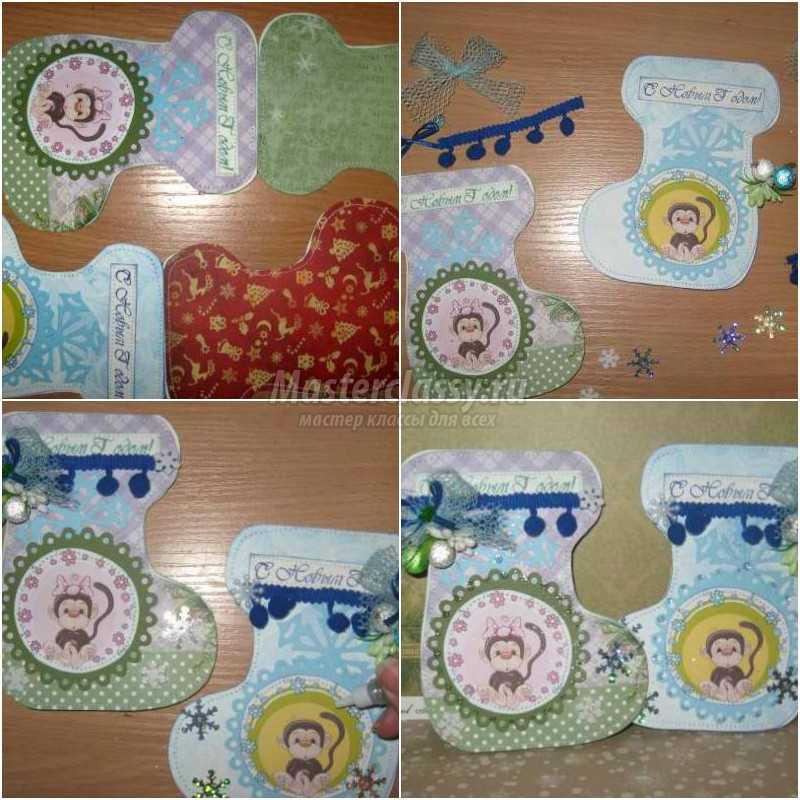
Attach the front boots to the substrates, each side, hide the machine separately. Cut a couple of pieces of blue satin ribbon 3 mm wide, blue ribbon with pompons and blue mesh. Tie a bows and place bouquets made of white stamens with a glitter and berries in sugar of different colors (green, blue, white, silver). Enclose the scenery, completing the decoration process will be dots to be supplied with a liquid silver gluitter in circles. Funny New Year's boots are ready!
New Year postcards do it yourself for 2018
It will be very beautiful to look with postcards in the form of Christmas bags, they can also be made it in the technique of scrapbooking.The first step will be cutting the template, it should be collapsed three times on watercolor paper and cut. Each bag is toned to make an attractive effect effect.

Cut in half the template and cut it all a couple of millimeters. Attach a single template to the New Year's scrapbook and cut 6 parts - 2 pieces for each postcard bag.
Immediately attach one detail to each substrate and accept for decorating the front. Cut the three stamped black ink inscriptions "Happy New Year!", Toned each edge and attach to the front pages. Stick also on the chopped red and white circle, as well as a picture on the festive subject. The entire decor is a typewriter.
As you know, almost every bag has religious and our exceptions, which is why cut off the pieces of red and white cotton cord, as well as a variety of ribbons (green and red, satin with a new year print, green and red from organza). All this magnificence "Tie" bags with bows with the help of New Year's Brads. Each front pouch glue to the substrate and the trick.

In the technique of scrapbooking make and.
Greeting card with your own hands for 2018 dogs
Such a technique as quilling is extremely like and children, and adults, because using twisted elements you can create very interesting and attractive compositions.To create a congratulatory card in the Quilling technique, you should prepare a card base, narrow long paper strips (you can buy ready-made, and you can also cut on your own). Dragon glue can be used as a fixing composition, it is also not to do without a tool for twisting and the thematic decorative element - snowflakes.

Make two fir branches, guided by photo tip. For the manufacture of a candle, secure the paper strip of the required color on the tool and twist the roll, then remove and dismiss slightly, pick up the ends from both sides. Flame candles twist the same way, just immediately use two colors of paper.

For the manufacture of bells, twist a dense roller, remove from the tool and immediately tide. Make another such element. When rolls get dry, then you should gently push the center with toothpicks. Press on both sides so that the bell is more flat.

In the right places of the Cutout Basics, apply glue, then lay out paper elements, slightly pressed with your finger. Try some time to disturb the product so that the glue grabbing. After gluing the bell tape, twist the tiny strip with a dense roll and pulling the tip, pose inside - it will be a tongue. To complete the composition, use a decorative element. Of course, this is one of the simple quilling postcard options, and in general, with the help of paper components, you can "draw" anything.
Make it and.
New Year's postcard 2018 Dogs do it yourself
Excellent bulk option postcards for the year of dog 2018 do it yourself You can do with the children, note that the design of it is such that if you wish to print a congratulation on the printer, then it should be done in the first.

To create a card base, take the cardboard A4 and bend it in half. On one half, draw the sketch of the Christmas tree - it is not necessary to do it in detail, there will be enough pair-triple lines.
Cut the corrugation to the strokes, they should have a half centimeter in height, the length will depend on the fluffyness of the future Christmas tree. Note that the strips should be of different lengths to get a stylized Christmas tree.
The next step is to glue the corrugated strips - first it is necessary to take the lower tier, and then gradually rise to the top. After sticking the strip should be assigned a bit so that the tree reminded the tree with the faldami skirt.
For decoration, you can use the Christmas tree on the top, pieces of "rain" and tinsel, sequins, etc.
New Year's holidays are approaching, it is necessary to buy a bunch of gifts for friends and relatives, but something can be done independently, because no one has canceled the principle of economy. Even if with gifts at all tight, the greeting card will be excellent. Whether you go to visit your parents or familiar homemade postcard, presented in honor of the holiday, will remind you for a long time.
Cards with dogs: ideas
Probably you already know that 2018 will be held under the sign of the dog. It goes without saying that the postcard with the year of the dog made by their own hands can be performed in the form of this four-legged being. There are interesting ideas moving postcards. One of them is a dog moving by language and ears. It is simply performed from ordinary colored paper.
Video: Moving card "Dog"
Another stunning idea is the dog from the animated series "Adventure Time". If the one who is intended for a postcard is a fan of the series, then you will definitely get to the point.
 |
Prepare: a sheet of yellow cardboard, along a small piece of black and white cardboard, a stationery knife, a ruler, marker, scissors, a pencil. |
 |
We apply the lines of ku in the center of the yellow sheet of cardboard. I carry a straight line for a ruler. This is the fold line so that the cardboard does not break. |
 |
Bend sheet. |
 |
The workpiece must be square, so you cut off too much. |
 |
From black cardboard, cut out two circles. |
 |
Of the white cardboard, we cut two circles with a smaller diameter. |
 |
We glue black items to the eye. |
 |
From above, we have white blanks. We glue an oval nose. |
 |
Marker draw a smile. |
 |
Cut from yellow cardboard a blank in the form of a horseshoe. From the reverse side, we glue the double-sided foamed tape. |
 |
Glue her over the nose. Foamed tape will give a postcard volume. |
Read Masks for split hair tips
Other options for postcards mostly are made in the form of applications, although they are not devoid of originality. Look a selection of photos. Among them are funny, cute, charming instances.


Indescribable charming scrapbooking - how to learn
What we are all about dogs, yes about dogs, because if the year of the dog comes, it does not mean that it is necessary to give New Year's postcards only with them. It is unlikely that someone will be against the beautiful postcard in the scrapbooking technique, for example. If you are not at all familiar with this kind of creativity, he can learn by studying the master class.
 |
From the tight cardboard sheet you need to cut the basis for the postcard. |
 |
From scrapbooks you need to cut the part for 4-5 mm less than the foundation. |
 |
For decoration, we use a flower of phoamyran, cutting in the form of twigs, leaves from phoamyran, artificial berries. |
 |
We are scrap paper with scissors - edge scissors. |
 |
We glue it to the base. |
 |
You need to make the back of the postcard. |
 |
Sut off the piece from the cardboard with a bending on a gluing 2-3 cm. Width arbitrary. We glue the part in the center. |
 |
Corners hang. |
 |
We glue on the front side of the foamyran leaves. |
 |
Then - cutting and berries. |
 |
From above placing a flower. We lingify small details, if necessary. |
 |
Making a bow for a bowl. Ribbons flash needle with thread. We are tightened and wind. The thread is fixed from the wrong side. |
 |
We glue a bow. From above glue bead. |
Here is another not too complicated in the manufacture of a postcard.
Video: Scrapbooking with a deer
If you, as a professional interests something in a forgiven, see the following instructions in the video.
Read How to celebrate New Year 2016 together
Video: Multilayer postcard scrapbooking
Are you familiar with the shaker type cards? Shaker postcard is unusual. Inside overflow and shrink shiny sequins. Let's make a postcard in the form of a Christmas ball. It is very simple.
 |
Such beauty will work. |
 |
Prepare the basis of cardboard. In the middle of the line, spend an acute subject on the outside. Bend blank. |
 |
Cut the background sheet of decorative cardboard. |
 |
Then another smaller size. |
 |
In the second sheet, we make a "window". As a stencil, use Babin from Scotch. You can use a circular or a ruler with circles. |
 |
Cut. |
 |
To create a transparent window, you can use any transparent material, for example, from packaging. |
 |
Cut the piece of suitable size. |
 |
The most important secret is the application of foamed tape. It should be pasted it in such a way as to create the necessary thickness, so we stick it into two layers, do not leave any slots through which the filler could be poured. |
 |
We select seats, beads, micro beads. Suck at the center. Several sequins glit on the glue moment so that they remain in place. Remove the protective film from the tape and glue. |
 |
We attach the decoration to the basis of the postcard on bilateral tape. |
 |
We stick a bow on top. |
 |
We make gel with a glitter kaima on the contour of the ball. |
Video: Shaker card with christmas tree
We offer to see the gallery of work in the technique of scrapbooking. Learn and inspire.


Unusual postcards: instructions and templates
In the postcards, the most valuable is, of course, congratulations, but the design is also important. Look at how to make a paper Santa Claus with a surprise inside.
 |
For the manufacture of such a postcard, a blank is 28 × 10 cm. |
 |
The upper part should be 8 cm long. |
 |
Lower length 6 cm. |
 |
Accordingly, the rear part will be 14 cm long. |
 |
You can paint with paint cardboard, and you can take a color double-sided sheet of cardboard. |
 |
Prepare a pore. Cut out a striq from black colored paper 21 cm long and 2 cm wide. |
 |
As well as paper square with cuts around the edges. |
 |
Black stripes to the holes. |
 |
Then we turn the possession of the postcard and glue the ends. |
 |
Figure scissors or simply by hand cut the coat finish. |
 |
Stick the strip in the middle of the bottom and at the bottom. |
 |
Exterior cut off. |
 |
In the middle of the top part of the postcard, too, glue the "edge". |
 |
On the plaque you can apply sequins. |
 |
Insert the wishes and secure the edges of the postcard. |
Read Decoupage champagne for the new year
There is something fascinating in unusually open postcards. Below you can find templates for such postcards


