Volumetric braids are modern versions of classic braiding. Beautiful, easy and simple hairstyles for medium hair for every day A delightful hair bow for yourself
Women are natural actresses. We always want to change our images, delighting ourselves and those around us with beauty and uniqueness. But when in the daily hustle and bustle it seems that there is simply no time for change, do not be discouraged. In our article you will find many unusual, beautiful and simple hairstyles for every day, photos of which clearly show the technique of creating them.
Easy hairstyles for every day
The famous artist Nadezhda Babkina rightly noted in her interview that a well-groomed woman can be seen immediately by her hairstyle. Simple DIY hairstyles for every day will help you create a favorable impression on others. No special skills or knowledge are required. All you need to do is take an elastic band, hairpins, and a comb and you can start creating the desired look.
Bun styling options
The classic bun occupies a leading position among quick hairstyles.
- Make a high ponytail.
- Put on a bagel.
- Tuck your hair into it.
- Braid the remaining ends into braids.
- Wrap them around the base of the barrel.
- Spray with spray and your styling is ready for a walk.


Light styling is not alien to the stars. For example, Jessica Alba at the Golden Globe ceremony shone with a Greek hairstyle that can be created in just a few minutes. Just put your hair in a low ponytail and twist it around your fingers several times. Perhaps a neat bun will perfectly complement your best look.


High Ponytail Hairstyles
You can carefully collect long hair using simple styling.
- Make a side parting.
- Braid the hair on both sides.
- Add a tie at the top and bottom of each binding.
- Braid to the middle.
- Connect both braids into one with an elastic band.
This option is perfect for going to work or university and asking the question: “How to do a simple hairstyle quickly?” will disappear by itself.

In some cases, harnesses can add good volume to even an ordinary ponytail. To create the style, gather half of all hair into a lower ponytail on the side. Divide the second half into 3 parts and twist into loose strands. Wrap them around the tail and decorate with a decorated elastic band. Available instructions for doing a simple hairstyle for every day are shown in the photo:

A quick and simple hairstyle will help out when you are short of time. Of course, provided that you have mastered the spikelet technique.
- Start braiding your hair in a French braid, taking hair from your forehead and temples.
- When you reach the top of your head, stop and gather the remaining strands into a ponytail.
- Fix with varnish.
A fashionable hairstyle with a casual effect is ready.

Fashionable everyday styling
Some styling options remain at the peak of popularity for many years. This is not the first year that fashionable hairstyles for every day have been trending: plaits, voluminous tops with backcombing and braids. Before creating the listed hairstyles, stylists advise applying thermal protection to your hair and straightening your hair with an iron. To add volume, a corrugated curling iron will be an excellent help.
Stylish braids
The easiest hairstyles can be done in just a couple of steps. For example, to create a braid, you need to perform the following steps:
- Apply a ball of mousse to dry hair
- Distribute over the entire length.
- Make a high ponytail.
- Divide it into 2 parts,
- Twist each one tightly.
- Intertwine them, winding one on the other,
- Secure the end of the braid with an elastic band.

Despite the unattractive name of the spit fish tail deserves special attention. Almost every girl can do it the first time. The braiding technique comes down to the fact that after dividing the hair in half, you need to separate it from the extreme sides along a thin strand and put it in the middle.
By pulling the strands from the bottom up, you can get an openwork braid for every day.


Various variations of braids for every day with your own hands using the “Waterfall” technique look so gentle and romantic that for this it is worth mastering the weaving pattern itself. In general, there is nothing complicated. The first binding is done like a regular braid. The next time you weave, you need to let go of the bottom strand and add a side tie instead. You can weave 2 braids, combining them in the center or bring them to the opposite temple, hiding the ends under a hairpin with a flower.

The French weaving technique can be used for cross braid. Start braiding from the temple and braid the hair from the forehead and crown. Then pull them out a little.
A headband braid looks better on highlighted or colored hair.


A hairstyle with pigtails in an original style can be done without having any special accessories on hand. Braid a loose spikelet starting from the forehead area. Pull out the braided and tucked strands with the sharp tip of a comb. The styling looks best on those with curly hair. long hair.
Luxurious curls
Natural curls are an excellent hair styling option for every day; they will create a romantic mood. If you don’t want to spend a long time fiddling with your curls, a straightener will come to the rescue.
- Take a strand of hair
- Twist it into a bundle.
- Run the styling product through your hair,
- Let cool.
- Do the same with the remaining strands.
- Spray on and enjoy light waves.

With large curls you will always look stylish. Curl your hair with a curling iron, first dividing it into 4 parts. Pin the strands located in the temporal region behind the ear with an invisible pin. Wear a regular or festive headband and curl your hair slightly inward, helping your curls take on a natural shape.

Beautiful hairstyles for special occasions
Refined and airy hairstyles will harmoniously complement the festive look. They will emphasize femininity and style, but do not forget that the main accents in a beautiful hairstyle come from correctly selected jewelry.
Elegant low buns
Voluminous hairstyle in greek style represents good combination lightness, plaits and braids. You can feel like a queen by following the steps in the photo below. The peculiarity of this styling is weak weaving and stretching of individual strands on the top of the head.
To make your styling volume last longer, highlight with wax the strands you want to focus on.

The image of a business woman will help to embody an unusual, but very easy installation on every day. It is based on a low ponytail and loose strands near the forehead. They are the ones who create the original weave around the hemisphere. Perfect hairstyle It will only work on long hair of the same length.

Classic seashells
Not all girls can pull off an elegant shell. Often the hair falls apart and is not collected with a roller of the desired shape. We offer interesting option famous styling, which is easy to do in any conditions. The ends of your hair should be gathered behind your back with an elastic band. Throwing it over your shoulder, squeeze the elastic between the sushi chopsticks and twist the roller, wrapping your hair tightly. The execution technique clearly looks like in the photo below:


Exquisite styling will look appropriate at any special event. After practicing a couple of times, you won’t spend more than 10 minutes doing it.
- Make a side parting.
- Twist most of your hair into a loose twist.
- Lay it out in a wave.
- Pin with an invisible pin.
- Twist the roller on the other side in the same way.
- Take the strands one by one, laying them in multidirectional waves.

The favorite hairstyle of Hollywood beauty Anne Hathaway can be found in the portfolio of almost every famous hairdresser. But how to do a simple hairstyle at home? Separate a strand from the forehead and temporal area with right side and secure it with a clamp. Gather the rest of your hair into a neat bottom bun. Release the right side of your hair from the clip and place it in a light wave under the bun. Decorate with pearl pins and pull out individual strands with a comb to add texture. This option is universal, it is perfect for both a wedding and a business meeting. 
Hair flowers
A large rose made of hair is a stylish and simple hairstyle for every day. Apply mousse or a small amount of wax all over your hair. Make 2 ponytails at the back of your head and, overlapping one on top of the other, tie a regular knot. Twist the resulting strands into a rope and twist them clockwise, forming an exquisite flower.
All steps can be easily repeated by looking at the step-by-step photo:

Fashionable hairstyles for every day in the shape of a flower will decorate a formal look with its appearance. You will need a donut for the bun, on which you will need to wind many small flagella from the ponytail. Before styling, warm up a little wax in your palms so that the original bun does not prematurely turn into a prickly hedgehog.

You can quickly create a romantic look for a meeting with a guy using a simple hairstyle with a flower and waves. The general concept of a hairstyle consists of the following stages:
- Select a strand at the back of your head.
- Place the first outer strands under it.
- Place the second tie on top of the middle strand.
- Secure the resulting ponytail with an elastic band.
- Braid it into a braid.
- Roll it in an inner circle.
- Curl loose curls with a large curling iron.
- Spray with medium hold spray.
A step-by-step hairstyle diagram is shown in the photo:

Creative styling
Many girls like to emphasize their individuality with bold hairstyles. Their advantage is that such styles look good and are suitable for any hair length. You can make cool hairstyles for every day with your own hands, inspired by ideas.
Updo hairstyles look the best way on girls with oval face. The simplest of them can be created in a couple of minutes. Make a ponytail out of your hair, loosen it a little at the base and thread the ends through it. Finally, tighten the elastic band and the youth fan is ready. This way you can create a beautiful ant on your hair. To do this, the fan is divided into 2 parts, and the tail is pushed through the hole again. Celebrities love this variation. Look how stylish Paris Hilton looks in this look.


Hair wrapped in a mesh looks intricate. To create it, you can use many small rubber bands or a special weaving technique. The mesh cell and pattern may vary depending on the tension and number of strands. The design made at the temple on one side looks stylish.


The French braid never ceases to amaze with its varieties. Braid the braids with an overhang in the face area on both sides. Braid the ends of your hair in the same way and gather with an elastic band. An easy hairstyle with braids for every day is ready.

A fun pin-up hairstyle can get a lot of admiring glances at a themed event. Gather your hair at the temple area and twist it inwards in the form of a roller. Use the remaining hair to create a ponytail. Divide it into 8 parts, treat them with mousse or styling gel and curl.


Quick hairstyles for every taste
Different hairstyles for every day allow you to always look beautiful. Today you can try on the image of Brigitte Bardot, and tomorrow you can braid an ordinary braid in an original design. Interesting hairstyle ideas for every day will help you experiment and find the very image in which you will feel organic.
Ideas for short and medium hair
You can do an original high hairstyle for every day right before going to work.
- Divide the ponytail into 3 equal strands
- Pin their ends with pins inwards.
- Fix all parts at the top, freeing the occipital part.
- Curl your bangs in the opposite direction
- Wear a nice headband.

Regular hairstyles can look stylish with a minimal set of accessories.
Curl the hair of a high ponytail inward to form a roll. Secure it with bobby pins and spray with spray. Gently straighten the sphere without disturbing its shape. Decorate the bottom with a miniature hairpin or crab.

If you are looking for the answer to the question: “How to quickly do your hair?”, then pay attention to the hair basket. Dividing your hair in half, gather each hair into ponytails at the top of your head. Braid regular braids and cross them together.
See the photo below for the step-by-step technique:

Updo hairstyles for every day in the style of Beyoncé are very popular. A backcomb roller and a thin elastic band will help you look like a Latin American diva. Part your hair in half lengthwise. Gather the lower part into a bun with an elastic band. Place the top one on a backcombing roller and secure with pins. Using a comb with a pointed tip, pull out individual strands to create the necessary accents. 
Ideas for long hair
Which girl hasn't dreamed of a variety of beautiful braids for every day? You can create a masterpiece without weaving, using small rubber bands. Its essence lies in combining the outer strands of a high ponytail. The thinner the strands you take, the more interesting and textured the braid will be. Finish the hairstyle by pulling out each braid. The use of false strands will give the effect of airiness to the styling.

Many people associate the image of Brigitte Bardot with bouffant hair. You can create it by combing your hair well at the crown and sprinkling it with a strong hold spray. But such a work will last no more than 2 hours.
A simple device - a roller on a comb - will help to securely fix the high styling.
It is attached under the hair on the top of the head and retains its given shape for a long time.

With an elegant top knot, you can get ready for a meeting in 5 minutes and have your hair pulled back beautifully around your forehead. The technique is extremely simple. You need to separate a couple of strands on both sides and tie them with a regular knot. To prevent it from coming undone, pin the part that is on top with a hairpin to the loose hair. Pay attention to the clip; if it is heavy, it will not stay on the hair. Crab is ideal for this case. 
A four-strand braid with a ribbon is a good hair styling option for every day. The principle of weaving is easy to understand if you do it at least once.
- Divide all your hair into 3 parts.
- Tie a ribbon of the desired color to the ends.
- Place the first strand on the left under the ribbon and on the second strand.
- On the other hand, do the opposite. Place the far right one on the tape and slide it under the third one.
- Continue braiding with this technique until the end of the loose hair.
The final version looks like a continuous strip of inverted bows.

Continuing the topic: “Simple hairstyles for every day with your own hands,” one cannot fail to mention the Celtic knot. First, select 2 small strands located next to each other. Twist the right one in a loop. With your left hand you need to wrap the hanging tip of the loop and push it inside from the back side. The finished pattern resembles a pretzel in shape. Following a simple weaving technique, you can create masterpieces from several braids.

A Greek style hairstyle is easy to do without having a special headband on hand. Throw all your hair back and braid a very ordinary braid. Screw it inside. Tuck the remaining tip into the hole at the base of the weave. Use the sharp end of a comb to pull out the strands at the top of your head. The styling looks best on those with curly long hair.

High hairstyles always delight men and are very popular among women.. Divide all your hair lengthwise into 3 parts and gather them into ponytails. Comb them thoroughly with a comb and curl the ends with a curling iron. Pin all the hair at the top of your head; if you have bangs, curl them in the opposite direction. 

Effective styling for a special occasion should not take much time, because there is still a lot to do. A successful option consists of 2 parts of hair styled differently and united by one common concept. From the right half of your hair, make a ponytail at the back of your head and curl it. On the left, braid a regular braid. Having previously pulled out the strands from it, attach it to the tail and wrap it a couple of times.


Scythe
If you think that a classic braid is too banal for a summer walk, we offer several fairly simple, but stylish options which will be an excellent alternative to traditional hairstyle.Option 1
To begin, make a parting on one side and start braiding from the opposite temple. Move diagonally, weaving strands from the crown and forehead area. As a result, you will get a stylish asymmetrical and not at all hot summer hairstyle.Option 2
It's very simple and fast technique, which will help to slightly improve the classic braid. First of all, tie a not too tight ponytail with a thin, invisible elastic band. Make a gap in your hair above the elastic and thread your ponytail through it. Then, braid your hair using any technique you like. Thus, a simple everyday hairstyle is ready.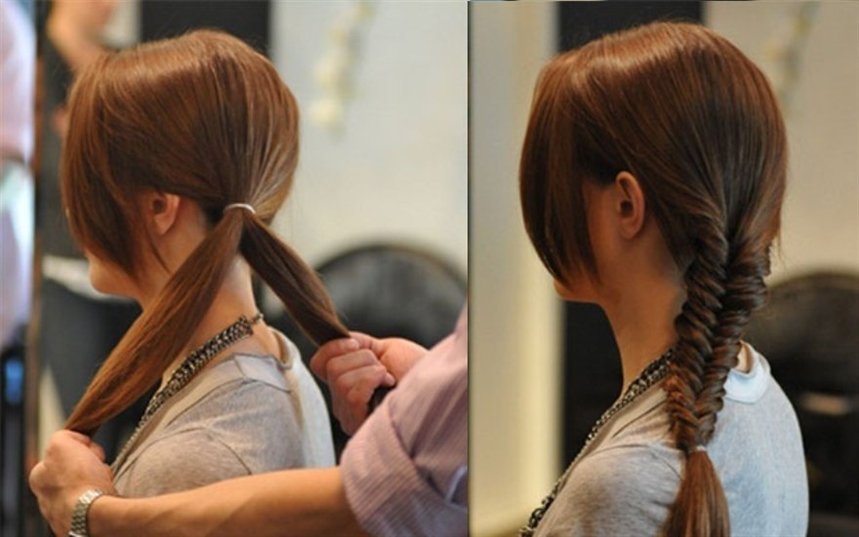
Option 3
This hairstyle looks great on long hair. To begin, tie a ponytail that is not too tight at the side. Make a gap above the elastic and let all the hair through it. To add volume, loosen a few strands. A little lower, tie another elastic band and repeat all the steps again. The number of sections depends on
Option 4
To get such a careless but stylish braid, you need to twist hair light waves and backcomb the top of the head. Then braid your hair using any technique you know. When the braid is ready, pull it in different directions to add volume. At the end, divide the hair into two parts, tie it in a knot and secure it with a bobby pin on the inside.
Option 5
Separate one side strand at each temple (above eyebrow level). Braid them into a braid. Grab a curl next to each braid and secure it to the back of your head with an elastic band or hairpin.Repeat the steps, separating the strands near the ears. Braid them into braids, grab adjacent curls and secure them at the back of your head. The rest of your hair can be left loose or braided.

Option 6
Comb your hair with a side parting. Separate the strand near the ear and braid the hair using any technique. Don't braid too tightly. Secure the end of the braid with a clear elastic band. Release the strands from the braid to give them volume. The final touch: spray your hair with hairspray. This option will look best on curly hair. If you have straight hair, spend a couple of minutes curling it with a curling iron.
Option 7
Make a side parting. Separate a section of hair from the parting and begin braiding the hair that frames your face. Use any technique. Having reached the neck, change the braiding technique and weave the remaining hair into the main braid. Once you've finished braiding, place an elastic band on the end of the braid. Release the strands, which will make your hair look fuller. Finally, spray your hair with hairspray.In the photo below you can see the combination of a simple braid and a fishtail. It looks very impressive.

Option 8
A quick and simple hairstyle option that even a first-grader can handle. Despite all the ease of weaving, the final result is a styling that others will consider unusually complex.So, divide your hair into three equal parts. We braid one braid from each part, the ends of which are secured with small elastic bands. Now take one braid and roll it into a ball. We secure it with hairpins at the base of the back of the head. We make balls from the remaining braids.
This hairstyle has only one drawback: true Rapunzels will have to tinker with braiding their curls. But the owners of hair middle length will cope with weaving in a matter of minutes.

Option 9
An inverted braid seems unusually complicated, but in reality everything is very simple. The braiding technique is surprisingly simple and with its help you will create a unique hairstyle in a couple of minutes.First level: separate one strand above your forehead and make a ponytail. To prevent the ends of your hair from interfering with your work, curl your ponytail onto the top of your head and secure it with a clip.
Second level: grabbing the side curls, we make a second tail. At the same time, we retreat a little from the first tail. Now remove the clip. We divide the first tail into two halves, between which we draw the second tail. We bring the tip of the second tail up and secure it with a clip. Leave the ends of the first tail below.
Third level: grab a strand a little lower, connect it to the free ends (from the first tail). Making the third tail. We remove the clip, divide the ends of the second tail into two halves and pass the third tail between them. We attach the third tail with a clip at the back of the head. Leave the ends of the second tail below.
We repeat the steps as necessary. Once you've finished braiding, secure the end with an elastic band. The final touch: carefully release the strands, starting with the very first ones. The higher the strand, the more volume we give it. It is not necessary to braid your hair all the way – the hairstyle will look chic even with three levels.

If you are looking for a simple but original summer hairstyle, an unusual ponytail will be an excellent option both for everyday life and for an evening walk.
Option 1
To create this hairstyle, first curl your hair a little at the ends. Tie the ponytail with a thin elastic band. Make a gap in your hair and thread your ponytail through it. If necessary, curl your hair a little more or separate the curls with your fingers to add volume.
Option 2
For this hairstyle, the hair must be straight, so if necessary, use a straightening iron. Then, divide your hair into two layers: top and bottom. Gather the top layer of hair with a thin elastic band at the back of the head on either side of the head. From the bottom layer, weave a braid in the opposite part. The thickness of the braid depends on your personal wishes. Wrap the braid around the elastic band of the ponytail and secure the end with a small hair clip.
Option 3
To create a more elegant ponytail, you will need hair foam or wax. Make an even parting (in the center or side, whichever suits you best) and gather your hair on one side. Apply foam to them and divide into two equal strands. And then just tie a knot twice in a row. Secure with a thin invisible elastic band directly under the knot, and twist the ends of the hair a little or lightly backcomb it.
Option 4
To create such a stylish ponytail that is perfect for any kind of summer event, you will need a curling iron or straightener, hairspray, bobby pins and a little time. To begin, curl your hair at the ends. Then divide them into 4 parts: at the back of the head, at the crown and on both sides at the temple, and tie them with elastic bands so that they do not mix with each other. Take the hair from the top of your head and comb it a little from the inside, and then twist it with a flagellum and secure it with bobby pins. Repeat the same with the hair at the temples. When the hairstyle is ready, spray it with hairspray to be secure.
Option 5
A very romantic summer hairstyle. To do it, divide your hair into two parts along the parting line. Braid braids on both sides, which converge from the temples at the back of the head. Tie them together with a thin elastic band. Then separate a thin strand from the ponytail and braid it. Wrap it around the elastic band and secure it with a bobby pin on the inside. Comb the tail a little with a comb or curl it with a curling iron.
Option 6
The ponytail is one of the most popular and universal trends in the world of hairstyles. This option is very fast and original. To begin, curl your hair at the ends and then divide it into two parts. From the hair at the top of your head, begin to weave a loose braid, weaving all the strands into it along the line of your forehead to open your face. The braid should end at the back of your head, and then lift the rest of your hair and tie it together using a thin elastic band. To hide the elastic, you can wrap it with a strand of hair and secure it with a bobby pin on the inside.
Option 7
Another easy and quick way to make an elegant ponytail. Curl your hair at the ends to create light waves. Then divide them into two parts. Comb the hair on the top of your head a little and tie it high with a thin elastic band. Gather the rest of your hair a little lower and also tie it with an elastic band. To create more volume at the top of your hair, loosen a few strands at the top of your head.
Option 8
This is a great way to turn an ordinary ponytail into an original hairstyle in a few minutes. Tie all your hair into a ponytail at the back of your head. Separate a small strand and wrap it around an elastic band to hide it, and secure with a bobby pin on the inside. Then tie another elastic band just below. Make a gap in the resulting sections and pass the hair through it. Tie another elastic band a little lower and repeat the procedure. The number of sections directly depends on the length of your hair. To make the ends look natural, curl them a little with a curling iron or flat iron.
Option 9
Divide your hair into 3 strands (central and two side). Secure each strand with an elastic band if you are doing your hair yourself. This way your hair won't get tangled. Roll the central strand into a rope and wrap it around the side ponytail on the right. Separate one curl from the left strand. Roll it into a rope and wrap it around the right tail. We also roll the remains of the left strand into a bundle and wrap it around the tail. We secure the hair with an elastic band.This hairstyle has several advantages. Firstly, we don’t need to maintain clear symmetry (uneven strands give a chaotic shine). Secondly, the absence of a parting allows you to disguise some defects: unpainted roots, dandruff or too thin hair.

Hairband made of… hair
This is the simplest and original way replace a regular headband and keep your hair out of your face on a hot day.Option 1
First, divide your hair into two sections. Gather the hair at the back of your head with an elastic band to keep it out of the way, and proceed to the strands at the front of your face. Make a parting on either side and begin to weave a braid, weaving strands into it along the line of the forehead. When the “headband” is ready, loosen the hair at the back of your head and enjoy the original hairstyle.Option 2
Separate a small section of hair from the neck area and weave it into a thin braid. Wrap it around your head and secure it with a bobby pin on the opposite side. This hairstyle looks great on curly hair.
Option 3
Make an even parting and separate two strands from both sides of your head. Weave them into braids, not too tight, and tie them at the ends with invisible elastic bands. Connect them together at the back of your head and secure them with bobby pins.
Option 4
Separating the strand in the bang area, we backcomb it. Near the ear on the right, we separate one curl and form a flagellum, twisting the hair away from itself. Secure the tip with a clear elastic band. Take the bobby pin and secure the tourniquet at the back of your head, closer to the left side.We repeat the steps on the opposite side: separate the strand near the ear; we form a flagellum; secure the tip with an elastic band. We place the second flagellum under the first and secure it with an invisible one.

Hairstyle in 30 seconds
If you’re running out of time and you’re in a hurry to attend an event where you need to be dressed up, these options are for you!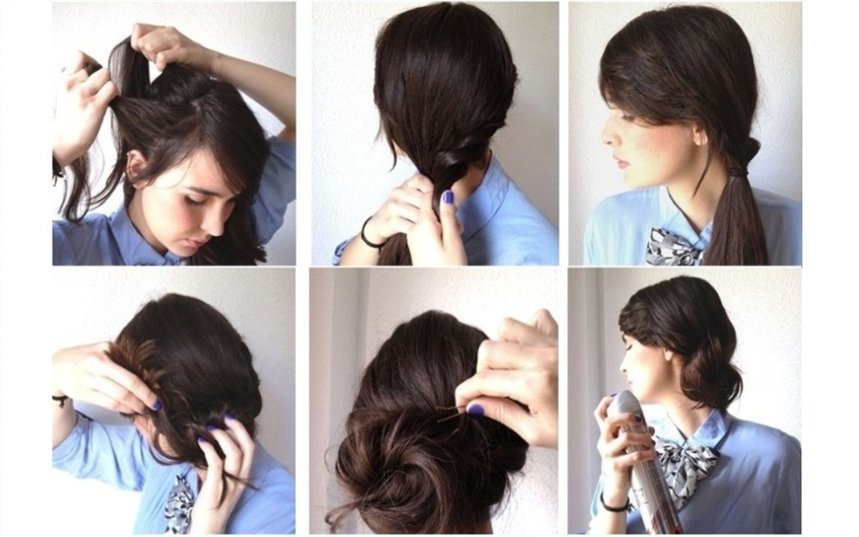
Option 4
Divide your hair into three sections. The middle one should be larger than the others. Weave it out voluminous braid and roll it into a knot using bobby pins or bobby pins. Roll the strand on the left into a bundle and pass it around the knot counterclockwise (from below). Wrap the strand that remains on the right around the hairstyle clockwise (through the top). Secure with bobby pins or spray with varnish.
Option 5
To achieve this hairstyle, you need hairspray, bobby pins and a little time to practice. To begin, fluff your hair with your hands to create good volume and apply generous amounts of hairspray. Then gather your hair together and curl it inward to form a shell. Secure your hair with bobby pins. You can leave a few loose strands to give your hair a sophisticated casual look.
Option 6
This is a very simple way to make a knot at the back of your head. First, tie the ponytail and divide it into two equal strands. Twist each strand clockwise. Then start weaving the strands together (counterclockwise). Tie the tourniquet at the end with an elastic band and twist it into a knot at the back of your head, securing it with hairpins.
Option 7
Tie a ponytail at the back of your head, not too high. Make a gap above the elastic and pull the hair through it. Then, carefully curl the tail into a shell and secure with a hairpin or other accessory.
Option 8
To make a hair bow, you will need a thin elastic band, bobby pins and 1 minute of time. To begin, tie a knot high on the top of your head and divide it into two parts. Pass the tip of the tail in the middle and secure it at the back with a bobby pin. This hairstyle is also called “Lady Gaga style bow”.
Option 9
This hairstyle will take longer to create than the previous ones. You will need a foam donut and pins. Tie a high ponytail, put a donut on it and hide your hair under it one strand at a time, securing it with hairpins for security. At the end, the hairstyle can be decorated with a bow or other accessories.
Option 10
Curly “donuts” look much more interesting than regular round ones, if you like ballerina buns. Such “donuts” can be bought in specialized stores or ordered online. The technique is no different from the classic versions. The hair must be tucked behind the donut.
Option 11
Pull your hair into a ponytail high on the crown of your head. Divide the tail into two halves, wrapping each with a flagellum. Now roll the ropes around the elastic band. We twist them tightly and in opposite directions (left - to the right, right - to the left). Secure your hair with bobby pins and fix it with hairspray.
Option 12
Divide your hair into two halves. Take the first strand and separate a curl from your forehead. We twist the curl away from ourselves, starting at the forehead and ending behind the ear. We tie the first ponytail low at the back of the head. We do the same with the second half of the hair. Now all that’s left is to roll the bagels. Ready!
Perhaps the most easy way To escape the heat in the summer and at the same time create an exquisite hairstyle - this is a Greek headband.
Option 1
Place a Greek headband on the top of your head and thread small sections of hair under the elastic. You will have a beautiful hairstyle in just a few minutes.
Option 2
It's more complex example how to use the Greek headband. For this hairstyle you will need two headbands. Place one under your hair and then backcomb the back of your head. The second one - put it on the top of your head and wrap the strands under it. Voila!
"Malvinka"
One of the fastest and cute hairstyles familiar to us from an early age, thanks to Malvina, a girl with blue hair. The main difference between this hairstyle: the hair is loose, the upper strands are pinned high on the back of the head.Option 1
A great way to add variety to your look if your hair barely touches your shoulders.Separate the strand above the bangs and backcomb it. Place a roller under the strand and secure it. You can use Velcro curlers as a roller. They stay on the hair better. We grab the side curls and (together with the combed strand) secure them to the back of the head with an elastic band. Using any thin object, we pull the hair out a little from above, giving it volume. Will do Chinese chopstick or an ordinary hairpin. It is better to pull out strands with your fingers on long hair, but not on short hair.

Option 2
Separate one strand at each temple (above the ear) and secure them at the back of the head with an elastic band. We grab the curl with the first strand, pass it over the ponytail and wrap it behind the first strand. We repeat on the opposite side: grab a curl, pass it over the ponytail and place it under the strand. We connect the ends of all four curls with an elastic band. It turns out to be a cute heart.
Option 3
Using a hair straightener, curl the ends on a few side strands. Separate one strand at the top of your head and backcomb it with a comb. To keep the strand in place, spray it with hairspray. Having laid the combed strand, pin your hair with a hairpin, making a “malvinka”. Ready!An excellent option for a romantic date, going to the theater and even for a wedding.

Option 4
Grab a wide strand (from forehead to ear) at each temple. Secure the strands at the back of your head with an elastic band, masking it with a thin curl. Chaotically, in any order, braid a couple of thin braids. To make it even more fun, you can curl the ends of your hair a little.
Option 5
Separate a strand at each temple and make two flagella (turning the strands away from you). Connect the flagella at the back of the head, tying them with an elastic band. Braid a braid from the loose ends of the plait, choosing your favorite technique. For example, ala “fish tail”.
Focus on accessories
With the help of ribbons and scarves, you can turn even the most ordinary ponytail into a work of art. Someone will think that hair with a scarf resembles a collective farm style. And he will be wrong! It's fashionable and beautiful - even Hollywood stars flaunt branded scarves skillfully tied to their hair. In summer, a scarf will protect you from the scorching rays of the sun. It also has other advantages: with the help of a well-placed scarf you can hide hair imperfections, overgrown roots, gray hair or a sparse parting.Option 1
Unwind and comb your hair. Tie a knot about halfway through the scarf. It can be a regular or decorative knot - to your taste. Place the scarf over your forehead (with the knot slightly to the side). Tie a double knot at the back of your head and hide the ends of the scarf behind the base of the fabric.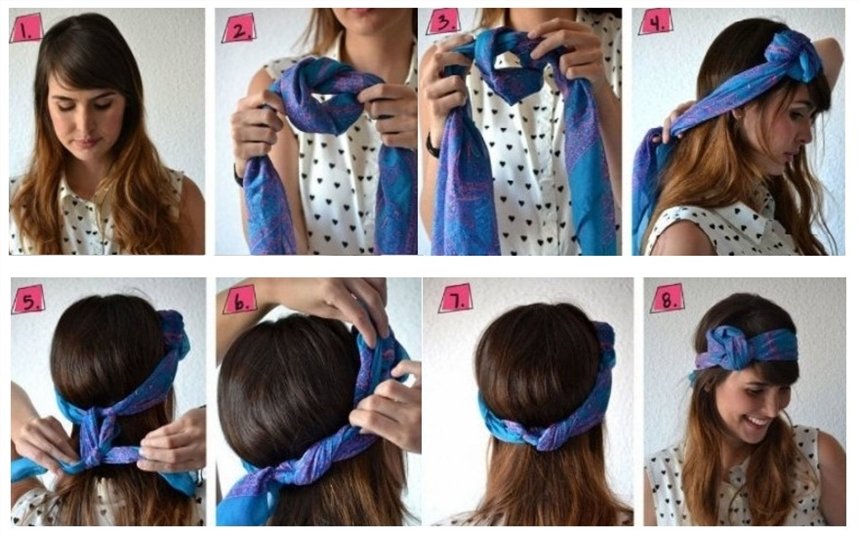
Option 2
Love fashionable images in pin-up style? Then you will like this option.Divide your hair into two parts: the back (crown and back of the head) and the front (forehead). Gather your hair in a bun at the back. You can pre-braid it into a braid, which will give your hairstyle a fixation. Twist the hair in the front into a braid, style it into a donut and secure with bobby pins. The finishing touch: tie a cute scarf or scarf around your head.

Option 3
Another great version of the “pin-up girls” image. Create long bangs by parting a section above the center of your forehead. Gather the rest of your hair into one or more ponytails (the ends of which are curled with a curling iron). The most important stage is the formation of bangs. It is the large bangs that are one of the distinctive features of this style. We wind the front strand onto a curling iron. Give it the desired shape and spray it with varnish. We tie a small polka dot scarf behind the bangs with a bow.
Option 4
The popularity of the film The Great Gatsby renewed interest in American culture of the 1920s. And, of course, this interest has not bypassed the fashion world. Ladies of that era, going to a party, preferred short hair, and long curls were tucked under a catchy headband. However, the headband was also worn on short hair. In addition, hair was often curled. If you like to visit Mafia clubs or jazz bars, then retro styling will come in handy. Let's look at one way to create this hairstyle.Comb your hair to the side and wear a glamorous headband. We pass the hair through the headband - strand by strand. Voila! We advise those with short hair to smooth their curls with gel and (where would we be without it?) wear a headband!

Among these hairstyles, you are guaranteed to choose several for yourself.
The next morning begins with the search for a suitable hairstyle. The styling should not only keep its shape throughout the day. The model should highlight external advantages, hide flaws, and combine with a stylish outfit. For any type of appearance, you can choose voluminous braids. Thanks to special weaving techniques, it is easy to create original options, skillfully giving the mop an elegant look.
Hairstyle features
Lush, volumetric weaving looks festive and elegant. The hairstyle is done for medium length and hair below the shoulders. You can create it on straight, thick, curly, curly strands. Thanks to a special weaving technique, it is easy to give the desired volume to sparse strands. A special feature is the composition of 2 or more strands, free weaving, and the use of elastic bands for intermediate fixation.

You will also need a whole arsenal of styling products and tools. The use of styling products is only advisable for special occasions, but full braids are also popular as daily styling.

Suitable for whom and for what occasions
The best option for long thick curls, styling will highlight luxurious hair. It can also be used by young ladies with curly, curly strands who regularly try to give their mop a neat shape. This cannot be done only on short hair; for partial braiding, the hair must reach the earlobes.

Who are voluminous spikelets suitable for:
- beautiful weaving will be appreciated by little princesses, young fashionistas, as well as mature women who want to look stylish and attractive;
- hairstyle is suitable for romantic dates, holidays, parties, important ceremonial events;
- many choose styling for every day; it will not go unnoticed by others;
- lush weaving suits tall, slender, curvy young ladies, miniature “inches”; thanks to various techniques and placement, external data can be corrected;
- for chubby girls, collected ones with bangs and strands near the face are suitable, the main volume is distributed in the area of the crown and crown;
- for girls with an elongated, triangular, diamond shape, you can experiment with various options braiding, including without bangs;
- combines with current stylistic trends, you can choose a model for a vintage or lush, festive dress.

If other types of braiding can be done the next day after washing, a voluminous braid is created only on clean curls. There are others Recommendations for achieving the desired result of a beautiful, voluminous hairstyle:
- for cleansing, choose a shampoo with a volume effect, conditioner for thickening and shine of hair;
- after washing the curls, you first need to dry them with a towel, only then use a hairdryer, it is important to lift the root area, then the hairstyle will look light and airy;
- goes well with, but you should not use fixing agents on this area, mechanical stress on varnished strands can lead to damage to the cuticle;
- The lack of volume can be hidden if you first curl the strands; you can use small curls like or.

Attention! Creating a hairstyle on curly, curly hair can be a real challenge, so it is better to use special creams and oils that give the curls softness and elasticity. We have prepared for you .
Can I do the styling myself?
Styling requires braiding skills, you need to master basic techniques, hairstyles with a lift,. More simple option styling with elastic bands is considered, even beginners can create it. Also You will need a standard set of tools:
- massage comb for combing the entire head, it is important to get rid of tangles and small knots that make weaving difficult;
- a thin comb is used to create a backcomb, part the hair, and comb individual strands during braiding;
- an iron, curling iron, curlers are needed to add volume, it is recommended to pre-curl the curls, curly ones, on the contrary, can be straightened, the texture of the braids will be no less interesting;
- It is recommended to choose high-quality elastic bands, hairpins, and bobby pins; they should not only fix the shape of the convex braid, but also not injure the hair;
- foam, mousse, clay, powder are used to add volume and preserve the hairstyle, gel, wax are useful for highlighting individual strands;
- For decoration you can choose headbands, ribbons, bobby pins, pearls, stones, but even without decorations the braid looks luxurious.

The cost in the salon depends on the chosen model, the qualifications of the master, the length, and density of the curls. To lengthen your hair and create a fuller shape, you may need extensions. Prices for convex braids range from 1,000 to 6,000 rubles; you can also do the styling at home by inviting a hairdresser.

Step-by-step instructions for weaving
Even a beginner can master the simple technique. step by step execution will help you avoid common mistakes. You can create a voluminous braid for medium and long curls; the styling is suitable for every day, and can also become a holiday decoration.
How to weave a voluminous braid:
Step 1. Comb the curls thoroughly, there should be no tangles or knots. Using a comb, mark the parietal area.

Step 2. Select 3 thin strands and begin weaving a standard three-strand weave.

Step 3. Moving from the crown to the crown, add thin curls from the temporal areas.

Step 4. At the back of the head, divide the ponytail into 3 thick strands and braid it in a traditional braid. Add the right and left parts to the central strand in turn.

Step 5. Starting from the tip, stretch each segment with your hands, gradually moving to the beginning in the crown area.

Step 6. Secure with varnish and tie the end with an elastic band.

Various weaving and styling options
You can make a 3D braid that is medium and below shoulder length. The original version emphasizes the beauty of thick curls. Suitable for slender, athletic young ladies, an excellent option for school everyday life. Stable fixation of the strands allows you to maintain a neat shape throughout the day. 3D weaving will decorate young girls with regular facial features.

You can braid it wide on curls that reach the level of your earlobes. The hairstyle is suitable for owners of a triangular, oblong, diamond-shaped oval, but is contraindicated for chubby young ladies. Emphasizes the freshness and beauty of youth, opens the line of the neck and shoulders. It will decorate a festive look and can be combined with other stylistic trends.

On medium curls, you can braid an elegant braid from strands or combine with. Feminine, romantic hairstyle looks stylish and modern. Suitable for young ladies, mature women will also appreciate it. To harmonize the shape of the face, it is recommended to create a backcomb on the top of the head. For sparse curls, it is recommended to choose a casual weaving option.

On long curls, you can collect hair turning into a ponytail or voluminous braiding. L A light, careless hairstyle with loose curls is suitable for various occasions; with the help of decor it can be turned into a ceremonial hairstyle. Flowing hair visually makes the silhouette slender and graceful; the hairstyle is recommended not only for fragile young ladies, but also for beauties with curves.

You can make it wide and lush with long curls of a straight or curly structure. Looks luxurious on colored strands, adding extra volume. The reverse braiding technique allows you to create an original braid that suits different types of appearance.

You can create an interesting braid by selecting individual strands or give a neat shape to the entire mop. The hairstyle is done on straight curls; to add volume, it is recommended to create large waves. Collected curls are suitable for young ladies with an elongated oval; half-loose curls have the properties of face correction, hiding minor imperfections.

Lush weaving is combined - asymmetrical,. In combination with a vertical spikelet, it allows you to give symmetry to facial features and advantageously emphasize the silhouette. Creates a gentle, romantic image, can be used as wedding option styling, adding appropriate accessories.

emphasizes luxury long curls, looks great with complex techniques, . They choose romantic natures, suitable for girls who prefer street glamor. A spikelet on its side has the properties to harmonize the appearance and highlight advantageous aspects.

A careless, disheveled braid suits creative, imaginative people who prefer a symbiosis of styles. Gives pomp to thin strands, thanks to the curls that have escaped from the overall braid, visually creating the effect of a voluminous braid.

Braids created on the basis of ponytails look neat. Suitable for schoolgirls, as well as young fashionistas with the correct oval shape. A light, practical hairstyle is an excellent option for active pastime, as well as everyday life.

Two braids are made for medium, long, straight and curly hair. They emphasize the correct facial features; styling is recommended for young girls. Not the best option for external imperfections, since the hairstyle does not have correction properties.

Backcombed braids visually lengthen the face and harmonize the shape. Suitable styling for special occasions, you can choose it as a wedding hairstyle option. Used for different types of appearance, the technique of increasing volume allows you to divert attention from a full face and make the silhouette slimmer.

How to braid a lush spikelet from thin hair
Not only professionals can weave a lush braid from rare curls. Using the secrets of stylists, it is easy to create a 3D volumetric spikelet:
- It is recommended to first twist the corrugation, then the hairstyle will look more voluminous;
- looks better on colored curls using the highlighting technique, coloring, monochrome tone hides volume;
- you can also use overhead tresses or Kanekalons;
- techniques with elastic bands, as well as careless weaving, are suitable for creating voluminous braids;
- Do not forget about backcombing in the area of the crown or crown.
Advantages and disadvantages
For many, braiding has remained a relic of the past, but voluminous braids are gradually winning an increasingly large army of fans, even among lovers of loose curls. The variety of options allows you to find suitable model for all occasions. The undoubted advantage is the ability to braid yourself. But to feel like a queen at a celebration, you should entrust your curls to professionals.

Pros:
- suitable for different age categories, mature women choose it, and the best option for little princesses;
- various models of braids with loose curls, fully collected strands, allow you to choose an option for all types of appearance and face shapes;
- goes well with bangs, which have rejuvenation and correction properties;
- you can completely remove the locks from your face, weave your bangs into a braid, focusing on your features;
- thanks to professional tricks, splendor and volume can be added to thin, sparse curls;
- combines with various stylistic trends, is suitable for creating a romantic, festive look, styling looks harmonious with casual, boho, grunge;
- corresponds to fashionable hairdressing trends; real works of art are created on the basis of a voluminous braid.
Minuses:
- performed at a medium and length below the shoulder blades; for short strands you will have to use overhead tresses, kanekalons;
- it is difficult to choose options for a formal business style;
- The weaving technique requires training and the use of styling products.
Stellar examples
Gigi Hadid prefers to combine a voluminous braid with a high ponytail.

Candice Swanepoel braids golden curls into lush original spikelets, hairstyles focus attention on the model’s perfect facial features.

Kristen Stewart prefers different types weaving, but in all of them there is always negligence in execution.

Blake Lively has luxurious thick curls. To create maximum volume, the actress also uses professional secrets, doing a ruffled hairstyle or adding a touch of negligence.

Selena Gomez uses voluminous braids, vertical spikelets emphasize the fragile silhouette.

Useful videos
Volumetric braid using elastic bands.
How to braid a voluminous braid? Easily!
A complete collection of materials: “3-tail hairstyle step by step” for you and your friends.
A woman's mood changes every day, every hour, and sometimes within a few minutes. During such periods, you often want to try something new, beautiful, get distracted, or just be happy. One of the simplest and most proven methods may be simple styling, and not necessarily in the salon, but also at home. You just need to stock up on ideas or choose the option you like on the fly.
Easy hairstyles, done step by step at home using a minimum amount of available products and styling materials, will become a real anti-stress remedy. They will also allow you to quickly transform before guests arrive, prepare for a walk, shopping with friends or an unplanned date.
Preparing to do your hair
Front Braid for Medium Length Hair
This hairstyle is based on a straight bob haircut. To perform this, make a side parting. Take a small front section of hair from the wider side. Apply mousse or styling foam to smooth and lightly moisturize your hair. Braid along the front line, gradually weaving strands from the face. Bring it to the temple line as long as there is enough hair length, and collect the end with an elastic band. You can decorate your braid with a flower or a beautiful hairpin.
Hairstyles for medium hair, described step by step in the instructions, require a minimum amount of styling time due to the practical and universal length.
Hairstyle with a front decorative braid on long hair
Owners of long hair who want to look impressive and at the same time spend a minimum of time and effort on styling should take note of this option. Comb your hair into a side parting. You will need a small section in front of the wider part. Braid it into a thin long braid. Secure the end with an elastic band. Place your hair on one side and wrap it with a braided braid several times, like a tourniquet. Secure the end with an elastic band again. The hairstyle is done quickly and does not require preliminary preparation. It is suitable for every day and will decorate a festive look.
Step-by-step hairstyles (photos are presented in the article), made with elements of braids, look extremely elegant, despite the apparent simplicity of execution. They emphasize the femininity and romance of the created image.
Hairstyle with a low wreath of braids on the back of the head
What could be easier than braiding simple braid? And if you place it strategically, you will get a spectacular and original hairstyle that can be styled every day. To perform the styling option shown in the photo, make a straight parting, and at the back, distribute the hair into two parts at the back of the head. Braid each of them into a side braid, weaving one strand from the center along the entire length. Secure the braids with elastic bands. Connect the resulting parts of the hairstyle crosswise, as in the photo, and secure with hairpins. It will work out beautiful wreath of braids at the back of the head, made in a careless technique.
This hairstyle looks good with summer dresses and romantic blouses. For those with bangs and medium-length hair, it is suitable for every day. Beautiful hairstyles done step by step at home do not have to be complicated to create the most effective and eye-catching style.
Knot with decorative braids on long hair
For those who love smooth and rather discreet hairstyles with romantic accents, the knot is ideal. It is necessary to first distribute the hair along the side parting. Leave the front strands on both sides free, and secure the remaining hair in a low, voluminous knot. Secure it with hairpins and bobby pins if necessary. On the wider side of the parting, braid two thin braids. Draw a line from the parting to the temples, weaving the hair in like a “spikelet.” On the other side, braid one strand, as in the photo. Wrap the knot in three braids and secure them with bobby pins.
A step-by-step hairstyle made using this technique is suitable for both the office and a romantic date, depending on the complementary details of clothing and accessories.
High knot with braid decoration
This hairstyle is suitable for a special occasion or a romantic date. The styling visually elongates the facial features, lengthens the neck and slims the silhouette. If you have bangs, separate them in a straight line. Tie the remaining hair into a high ponytail. Secure with a tight elastic band to prevent the hairstyle from slipping. Separate one strand. Tie your hair into a high knot with or without a twister. Secure with pins. Braid the strand and twist it around the base of the knot. Decorate it artificial flower or a beautiful hairpin.
Beautiful hairstyles, done step by step using a twister, take about 5 minutes to style, and look even and smooth throughout the day.
“Shell” for a classic office style
Girls rushing to work sometimes don’t have time to beautiful styling. A simple and beautiful “shell” hairstyle will cope with this task. It will fit perfectly into a casual office look. To do this, you will need a hard thin elastic band and two sushi sticks if the styling cannot be achieved evenly with your fingers. Comb your hair to the side, tie it in a low ponytail, as in the photo. Take two sushi chopsticks or knitting needles. Roll them inside your hair, creating a “shell”. Secure the hairstyle with hairpins along the line of sticks/knitting needles. Spray with hairspray to smooth out unruly hairs.
Hairstyles for every day, described step by step in the article, are also suitable for the office. You just need to give your hair a smoother and more even texture, associated with a business dress code.
Hairstyle with voluminous braids on long hair
This installation will take just a few minutes to complete. You just need to give your hair an elastic, voluminous texture by applying foam or styling mousse to prevent the strands from unwinding. To do this, divide your hair into two parts. Tie one into a low ponytail. Divide the second into three more horizontally, as in the photo. Twist each strand into a braid, and then gather all three into one ponytail along with the other half of the hair. Decorate your ponytail with a flower, a beautiful hair clip or a colored elastic band. The styling looks impressive on highlighted hair, creating a fancy pattern along the line of the strands.
A step-by-step hairstyle made using this technique will decorate a festive or romantic look.
Inverted ponytail hairstyle with a cascade of three elements
This style will fit well into casual look and it will be appropriate for a special occasion if you decorate the hairstyle with festive decor. A step-by-step hairstyle of three inverted ponytails can be done quite quickly. It is necessary to prepare voluminous and smooth hair texture to create a styling mood. Use a hairdryer, mousse and a round brush. Then divide all your hair into three horizontal sections. Pull each one into a loose ponytail with a tight elastic band, as in the photo. Starting from the top, turn the tail inside out and thread it through the bottom. And so on until the last.
If desired, you can increase the number of horizontal elements. Beautifully style your hair falling down your back and spray top part varnish.
Low bun at the base of an inverted ponytail
This option is a variation of the previous one, but with one element. The hairstyle is suitable for the office, for every day or for a celebration with appropriate decoration. Prepare smooth and voluminous hair texture. Pull them into a loose ponytail at the back of your head. Turn it inside out, as in the photo, and then twist it into a roll and secure it with hairpins into a low bun. Spray your hair with hairspray. Add a flower or a hairpin. A step-by-step hairstyle made using the inverted ponytail technique has two advantages: it is created very quickly and at the same time looks extremely impressive.
Each of the presented styling options will allow you to create a new style in a matter of minutes. The hairstyles done in stages, the photos of which are presented above, are easy to perform, time-saving and require a minimum set of styling products and tools. Choose an individual option for a daily look, for an important occasion - and forward to new styles!
Ponytail braid – 5 ideas and 9 video lessons on how to implement them
Having learned how to weave a braid from ponytails, you can spend less time creating original hairstyles, and also be confident in their accuracy throughout the whole day of wear. Such solutions, due to elastic bands and weaves, last longer than usual. A original solutions The designs that can be created using tails will amaze you with their variety.
One of the options for creating a braid without weaving
Best Easy Solutions
A professionally done ponytail braid looks like a real elaborate braid. In order to start doing complex options, you first need to master basic methods that look very elegant and original.
You can weave simpler solutions yourself, but for this you need to practice in advance. Leave at least 40 minutes to work.
Classic scheme
Detailed explanation of the scheme:
- Take a small curl of hair above your forehead, tie it with an elastic band and throw it towards your face.
- Tie another one right below it.
- Return the top ponytail, dividing it into two halves.
- Throw the second ponytail towards the forehead above the first, “clasping” it with two strands of the second.
- Gather these two strands together and add more hair from the left and right sides of your hair.
During the braiding process, you should stretch the hair a little
- Tie them into a ponytail.
- Return the top strand and divide it into two parts.
- Repeat steps 4 to 7 until you finish weaving.
- While braiding, lightly pull the hair out of the elastic to make the braid more voluminous.
- The result is ready.
Before braiding, you should apply foam to your hair or just dampen your hair a little.
You can make such a braid on hair treated with a corrugated iron
The following video tutorials will help you master the creation of this hairstyle even faster:
Simplified braid
An even simpler option will allow you to diversify your style. You can create such a hairstyle with your own hands; it is not complicated, but the result is impressive.
Step-by-step instructions for beginners:
- Tie a high ponytail. Divide it into two parts - upper and lower.
- Tie the top one with an elastic band at a distance of 5-7 cm from the root zone.
- Thread the bottom of the main curl through the hole above the elastic on the top strand of the ponytail (from the inside out).
- Also make a ponytail from the threaded part, now it is on top, and the bottom strand will need to be threaded through it identical to step 3.
- Next, repeat steps 4 and 3 until you have braided hair. If desired, the hair from the elastic bands can be slightly pulled out.
This is what the finished result looks like
If you take small curls, you will get almost a fishtail braid, only without braiding. You can try to create this option without the first step, or simply complement it with another hair design.
Video tutorial on how to implement this idea.
Creating complex braids
Having mastered the basic instructions, you can safely take on more complex and original solutions that you can create even at home. Stock up on a comfortable comb, comb, small elastic bands and try bright and original braids without braiding.
Having mastered the easy methods, you can move on to more complex ones.
Stylish 3D braid
The original 3D braid with elastic bands is more complicated than the above hairstyles, but the finished result looks very voluminous and festive. This idea can be implemented with your own hands, but it is better to entrust this matter to someone who will be easier to see the process and control the design of the hair.
Photo of the finished result
Detailed instructions for creating such a 3D braid:
- Tie a section of hair from the forehead, as well as two sections of hair of the same size below, into three ponytails.
- Divide the topmost ponytail into three parts, and the one that goes below into two.
- Place the middle strand from the top curl between two strands of the bottom one, while holding the latter perpendicular to the head in one hand.
- Then, with the left and right ends of the upper ponytail, “grasp” the curls that you hold perpendicularly, bringing them from the left and right sides, respectively.
This hairstyle can be varied with other braids.
- For now, pin the strands that you have in your hands on your side or throw them to the side of your face; we will need them later.
- The three sections of the top curl, which are now threaded through the two curls of the second ponytail, need to be lowered to the third ponytail, and tied with a small elastic band together with the last one.
- Now we have a set aside ponytail of two strands, and a second ponytail knitted in step 6. Tie another ponytail below, separating strands from your hair.
- Repeat steps 2-6.
- Next, when you again find yourself at step 7 with 2 ponytails, tie the third one again, and repeat steps 2-6.
- You need to pull out strands from the finished braid to give it volume. Start from the top of the hair, first pulling out the middle strand, and then the right and left, and go down the entire length of the hair.
Volumetric braid from different angles
Video tutorials to help you weave:
Inverted tail braid
A rather complex, but at the same time creative hairstyle will be an excellent addition to a romantic image, suitable for an evening dress and even a business suit.
The luxurious result of intricate weaving
How to implement this idea:
- Take hair from the left and right side of your hair and tie it. Pass the ponytail through yourself, up through the bottom, and throw it towards your face.
- Do the same with the lower section of your hair - gather a wide strand, tie it, turn it out and then throw it up or pin it with a hairpin so it doesn’t get in the way.
- Repeat step 1 until you have covered all the curls. Then lower the strands thrown up.
The process of threading strands
- Divide the top ponytail into two halves and place them together. Then pin the resulting left half with a large hairpin so that it does not interfere.
- Repeat step 4 with all curls collected.
- As a result, you ended up with several tips on the left and right sides of your head. Connect their ends together at the bottom of your hair, slightly wrapping the curls in an arc, and secure the ends with bobby pins.
- Secure the finished result with strong hold varnish.
The price of such weaving in salons can reach up to 1200-1500 rubles, therefore, having mastered the hairstyle, you can pamper yourself and those around you with an original look for free. Detailed video tutorial for creating this weaving option.
Butterfly braid
An equally original and magnificent solution would be the “Butterfly” option, which you can also create yourself, but you will have to practice.
Creation instructions:
- Take small pieces of hair from the left and right sides of your hair and tie them. Divide the resulting strand into two parts.
Use small silicone rubber bands
- That part of the left strand of the formed ponytail that remains above the elastic band must be divided into two parts and the left strand created at stage 1 must be threaded through them, moving from the outside to the inside.
- The same must be repeated with the right strand, which must be threaded in the middle of the right strand over the elastic band.
- The threaded hair should be carefully pulled out to create voluminous arcs; you can also fluff it with a comb.
- Next, add curls from the left and right sides of the hair to the ends of the first “butterfly”, tie the tail and repeat steps 2 to 4. Then, according to these instructions, you need to tie into tails and decorate all sections of the hair.
This is what the Butterfly hairstyle looks like
The curls need to be straightened carefully, while making “wings” of the same size.
Video tutorial on creating “Butterflies” from hair.
A hairstyle created using ponytails allows you to imitate luxurious braids, while weaving them will not take you much time. Choose easy or complex solutions, use the instructions that are most convenient for you, and decorate your looks with stylish braids!
If you have any questions about the article, ask them in the comments and we will answer you. More interesting ideas you will find in the video in this article.
Braid with rubber bands
A braid made from elastic bands is an excellent alternative to complex weaves. It is accessible even to dads, and it looks even more beautiful, interesting and richer.
Volumetric braid
This luxurious hairstyle is in no way inferior to complex hairdressing creations, and can be done in literally 10 minutes. It can be created even on not very thick strands, without having any experience at all.
- Comb your entire hair back.
- Tie them together with a thin silicone rubber band.
- A little lower, separate exactly this section and tie it as well.
- Turn it around its axis, forming an inverted tail.
- Continue gradually tying and turning out the ponytails along the remaining length.
- Gently stretch each section with your hands to create a voluminous and voluminous hairstyle.
If you want to improve the condition of your hair, Special attention It's worth paying attention to the shampoos you use. A frightening figure - 96% of shampoos from popular brands contain components that poison our body. The main substances that cause all the troubles are designated on labels as sodium lauryl sulfate, sodium laureth sulfate, coco sulfate, PEG. These chemical components destroy the structure of the curls, the hair becomes brittle, loses elasticity and strength, and the color fades. But the worst thing is that this nasty stuff gets into the liver, heart, lungs, accumulates in organs and can cause cancer. We advise you not to use products that contain this chemical. Recently, experts from our editorial team conducted an analysis of sulfate-free shampoos, where products from Mulsan Cosmetic took first place. The only manufacturer of completely natural cosmetics. All products are manufactured under strict quality control and certification systems. We recommend visiting the official online store mulsan.ru If you doubt the naturalness of your cosmetics, check the expiration date; it should not exceed one year of storage.
Braid in the form of bows
Bow-shaped braids look very elegant and are ideal for girls of all ages - from schoolgirls to young mothers.
- Comb your entire hair back.
- Using a horizontal parting, separate part of the hair at the level of the temples.
- Tie it with a thin elastic band.
- Divide the ends in half.
- Form one part of the bow by pulling the strand through the elastic, but without pulling it out completely.
- Cross the elastic again and secure the second part of the bow with it.
- To be secure, secure it with hairpins.
- Back off a couple of centimeters and tie the ponytail again.
- Divide it in half and form a bow according to the already known principle.
- Repeat these steps again until the last bow is at neck level.
- Gently stretch the weave with your hands.
- Secure your hair with hairspray and pins.
French braid
A beautifully braided French braid is the perfect solution for a variety of events. It will add charm to your look and make it incredibly feminine.
2. Using a horizontal parting, separate part of the hair at the level of the temples and tie it into a bun.
3. Separate a thin strand and wrap an elastic band around it, hiding the tip under the hair and pinning it with a bobby pin.
4. Just below, separate another small section and tie it as well.
5. Divide the first tail in half and pass both halves under the second tail.
6. Lift the second one up and secure it with a clamp so that it does not interfere with it for now.
7. Below, separate another section and tie it with an elastic band.
8. Release the second ponytail from the clip, divide it in half and pass both halves under the third.
9. Continue weaving to the desired level. Don't be lazy and French braid the entire length.
10. Gently stretch the sections of the braid with your hands. This will hide the elastic bands and make your hair look voluminous.
In the same way, you can braid a braid around your head - ideal for holidays and work.
To braid such hearts, it is not at all necessary to master the complex technique of French weaving. It is enough to stock up on a few basic items.
1. Comb your entire hair back.
2. Separate two strands near the forehead and connect them with an elastic band at the back of the head.
3. Turn the tail through the hole in the middle.
4. Separate two more similar strands at the temples.
5. Connect them to the tip of the first ponytail and tie it, retreating a couple of centimeters.
6. Turn the ends through the hole inside the hair.
7. Tie a third ponytail from the remaining strands and also rotate them around its axis.
8. Stretch the inner parts of the weave with your fingers, giving them the shape of hearts.
How to weave a fishtail without mastering the classical technique? Our detailed master class will help you easily cope with this task. In just a few minutes you will be able to create such a stylish hairstyle that will not go unnoticed by others.
1. Comb it all back.
2. Separate two small strands from the left and right sides. The thinner they are, the more beautiful the braid will turn out.
3. Connect them together at the back of the head. Do not tighten the elastic too much - it will have to be pulled down.
4. Separate one more thin strand from both sides of the head and connect them immediately under the first ponytail.
5. Create an inverted ponytail by twisting the second pair of strands under the elastic of the first pair. It is important not to catch the central hair, otherwise the styling will look sloppy.
6. Again, separate a thin strand from both sides and tie them.
7. Twist this pair under the elastic that secures the first tail.
8. Continue to select the side strands, connect them with each other and pass them under the elastic band of the first ponytail. To increase the length of the braid, gradually lower the elastic band down, only very carefully so that it does not break.
9. On last stages When almost the entire length is woven into the braid, do not throw it through the elastic band, but simply tie it in the center.
10. Slightly stretch the sides of the braid with your hands so that the fishtail becomes as fluffy as in this photo. The tip can be decorated with a bow, hairpin or ribbon.
It's fast, easy and original styling for long strands.
1. Tie your hair at the base of your neck.
2. Stepping back a few centimeters from the elastic band, tie another one. The distance between them depends on the length of the hair and your preferences.
3. Divide this section in half.
4. Pull the ends of the strands into the resulting hole.
5. Step back the same distance and tie another elastic band. Form an inverted tail.
6. Continue weaving to the desired level.
This incredibly intricate braid is a great choice for special occasions. It will never occur to anyone that you created it yourself! Watch this tutorial and follow the entire process step by step.
1. Comb your hair into a side parting and curl it with a flat iron. This will give your hair extra volume.
2. Using a horizontal parting, separate part of the hair approximately at the level of the earlobes and pin them with a clip so that they are not in the way for now.
3. On the left side near the ear, separate a small strand and tie it into a ponytail.
4. Pull it through the base.
5. Gently stretch its sides with your hands.
6. Take two more thin strands a little lower, tie them and turn them out.
7. Continue turning the ponytails out along the entire length in this part.
8. Release the main part of the hair from the clamp.
9. Separate small sections from it on the sides and pin them with clamps.
10. Braid the central part into a fishtail.
11. Tie the end and gently stretch the sections with your hands.
12. Wrap this braid around the first braid. Hide the tip inside and pin it with a bobby pin.
13. Release the strands on the sides from the clamp.
14. Braid them into French braids, picking up loose curls on one side only.
15. Pass them through the base of the fishtail and wrap the already formed hairstyle. Hide the ends inside and pin with bobby pins.
16. Straighten your hairstyle, giving it fullness.
This voluminous crimped braid will make you look like one of the Disney princesses.
1. Comb your hair thoroughly.
2. Pin up the bulk of your hair, leaving only the bottom section.
3. Go over it with an iron with a corrugated attachment.
4. Gradually release new sections of hair and iron them.
5. Tie your hair at the top of your head.
6. Divide into four parts. Tie the two outer ones together with a thin silicone rubber band.
7. Stretch the braid slightly with your hands, pulling the strands up.
8. Again, make a ponytail from the outer strands and stretch it with your hands.
9. Repeat these steps along the remaining length, carefully stretching each section.
A braid of ponytails with elastic bands will be the best option for everyday wear to work or school. Your hair will not get in the way, because you will put it away in an elegant hairstyle.
- Comb your hair back.
- Using horizontal partings, divide it into three equal parts.
- Tie each one with an elastic band.
- Turn the first tail around its axis, making it inverted.
- Connect the ends to the next ponytail and repeat the same action.
- Now connect the ends of two tails to the third and repeat the process again.
- Straighten the braid of elastic bands and ponytails to make it fuller.
🧡 147 👁 113 943
Sometimes, to do a hairstyle, you need to spend a lot of time and effort, and the result may not live up to expectations... We offer you a selection of easy hairstyles for every day that you can do with your own hands in just a few minutes!
Thanks to such simple hairstyles, you can surprise your colleagues and friends with new looks every day, choose a hairstyle for any set of clothes and, even if you don’t have time to get ready, look great!
Step-by-step photo lessons of simple hairstyles for every day
Easy hairstyle with two braids for every day
This hairstyle is perfect for work, school or walking. It is enough to braid two braids and fasten them at the back to create an interesting hairstyle. You can style your hair either with an even parting or with a side parting.
Stylish shell hairstyle
The shell hairstyle is suitable for office style and business meetings. However, if you decorate it with a beautiful hairpin, then in tandem with evening dress she will create a romantic and elegant look. The shell hairstyle has the right to be a little disheveled, and a few curls near the face will complement the look.
It does not take much time to create; the hair must be twisted to one side and secured with hairpins.
Volumetric styling with a ribbon in the style of Brigitte Bardot
1. Separate part of the hair from above and comb it, using hairspray to fix it.
2. Gather the hair at the back of the head and grab strands at the temples, they will support our bouffant. At the same time, do not pinch the tail with an elastic band; the volume should be preserved.
3. Tie a ribbon and fix the hairstyle again with hairspray - easy hairstyle ready for the evening!
Easy hairstyle with braiding and bun
For this hairstyle, we need a special roller to create a voluminous bun; if you don’t have a special bun, then a regular sock will do, you just need to cut off the front part of the sock and twist it. If you liked the hairstyle, also check out " " 🧡
1. Tilt your head down and comb your hair.
2. Start from the bottom hairline with a French braid.
3. Finish the braiding approximately at the top of the head and collect all the hair, secure the base tightly with an elastic band.
4. Take a donut and twist your hair around it to create a full bun.
Another option for a simple hairstyle with a bun and braids
1. Part your hair evenly.
2. Braid two identical braids on each side. To do this, you need to start braiding a French braid, make a few stitches of braids, grabbing the hair, and then finish the braid in the usual classic way.
3. Gather all your hair into a ponytail at the bottom of your head, including the ends of your braids.
4. Now use a roller or sock to twist volumetric beam.
Bun twisted into a knot
A simple and quick hairstyle, in case you have 5 minutes left to get ready! Just divide your hair into two equal parts and tie it in a knot, then twist the strands into ropes and wrap them around the knot, secure the hairstyle with hairpins and you are ready!
Easy hairstyle for a Great Gatsby themed party
For a hairstyle in the style of the 30s, you will need a special headband, it is better if it is decorated with stones or beads. Divide your hair with a side parting so that 70% of the hair is on one side. Place the headband on your head and begin twisting your hair around the elastic at the back, creating a slightly messy hairstyle. This should be done from one ear towards the other. When you reach the second ear, create a small loose bun and also secure it with an elastic band.
Braid crown - a simple hairstyle based on braided braids
A fairly specific hairstyle that is suitable for a certain occasion or style. Divide your hair into two halves with a straight parting in the middle and braid 2 fishtail or braids. Do not make the weave too tight, it should be loose and voluminous. Now cross each braid to the opposite side along the top of your head and secure it behind your ear with a bobby pin. The braid crown is ready! Do you like braids for long hair? Check out our site, for which the editor was awarded!
Beautiful hairstyle for thick hair
The hairstyle is quite light, but it requires long and thick hair, then it will turn out voluminous and interesting. The hairstyle combines a French braid and a bun.
Easy romantic hairstyle with curls with your own hands
This delicate hairstyle is suitable for medium-length hair. Create a low ponytail at the back, leaving two wide strands of hair near your face. We make a bun from the ponytail; it can be done in the usual way by twisting the hair into a rope or using a roller to get a voluminous bun. Then we twist the front strands with hair curlers, secure a few strands around the bun, and also leave a few strands loose near the face.
Loose hair with a French braid
The hairstyle is very light and at the same time looks very stylish. Before creating a hairstyle, you can curl your hair slightly. We part the hair on the side. Start the French braid from the parting along the hairline towards the back of the head. After making several grabs of hair, finish braiding in the usual way. Then separate a small strand from the other side of the parting and connect this strand and the end of the braid at the back of your head. Tuck the loose strand under the braid and secure it with a bobby pin, and do the same with the end of the braid. Fix your hair with hairspray and catch admiring glances.
Voluminous ponytail with braided spikelets - easy styling for every day
1. Part your hair to the side.
2. From the side where most of the hair is, start braiding a spikelet or fishtail braid.
3. Braid the braid to the end and secure the end with an elastic band.
4. At the back of the head we collect the hair and secure it with an elastic band, catching the braid there. Position the braid so that it lies beautifully on the head and goes into the ponytail. You can make a small backcomb on top for volume.
5. Wrap a small section of hair around the base of the ponytail to hide the elastic.
This hairstyle looks very beautiful and elegant, so you can wear it to a celebration or a romantic evening.
A variation of the previous hairstyle with a French braid
The hairstyles are very similar to each other, the only difference is what kind of weaving to do. In this version we do French weaving.
Evening simple hairstyle for long hair
Make a low ponytail and turn it inward as shown in the photo. Comb your hair until it doubles in volume. Now we carefully collect the hair and tuck it into the resulting hole, so that at the bottom we get a voluminous bun. Place above the beam beautiful decoration or a hairpin.
A quick way to make curls
This is perhaps the fastest way to style your hair with curls!
Triple ponytail - an easy hairstyle for every day
The hairstyle is suitable for girls at school and at kindergarten, it is quite strong and can last all day.
1. Separate the first part of the hair from above and make a ponytail. Using a strand of their tail, we wrap the base to hide the elastic.
2. Separate the second part of the hair a little lower and make a second tail, while also capturing the tip from the first tail. We also wrap the tail with a strand.
3. Do the same with the remaining hair and wrap the ponytail with an elastic band again. The triple tail is ready!
You can also make a ponytail not from 3, but from 5 or more parts. To do this, take small strands of hair and add the previous collected hair to them.
French braid and bun
A beautiful easy hairstyle that is suitable for long hair; in order to create it you only need to know how to french braid, step by step lesson you can look at the photo.
Ethnic motives
This hairstyle can also be called Boho style. This effect is achieved due to the arrangement of the braids, which resemble special ethnic jewelry. Quite an original styling that won’t be difficult to do.
Summer hairstyle with headband
Instead of a headband, you can use a rolled scarf, a wide ribbon, or a straw headband. The style of this hairstyle is relevant in the summer because the headband is a bright accessory that cannot be hidden under a hat.
Delicate look with a high ponytail and loose hair
1. Curl your curls using a curling iron or curling iron.
2. Separate a small strand of hair from temple to temple on top and lightly backcomb it.
3. Gather a ponytail at the top of your head and secure it with a small elastic band.
4. Using a thin strand, wrap the base of the ponytail and secure it with a bobby pin.
5. Spray your hair with hairspray and enjoy in a gentle way princesses - easy, quick and simple!
Twist braid - an easy ponytail-based hairstyle
1. Comb your hair thoroughly and gather it into a ponytail at the back of your head.
2. Divide your hair into two equal parts and twist them into two strands
3. Then twist them together and secure the end with an elastic band. In this case, you need to twist the strands in one direction and twist the braid in the other, then it will be in the form of a beautiful spiral.
Quick hairstyle for school with inverted ponytails
This hairstyle allows you to open your face and remove strands from your eyes so as not to interfere with your studies or work; it looks especially beautiful on long, thick hair.
Twist the flagella
To create this easy hairstyle you will need no more than 5 minutes, and it looks feminine and gentle, take note!
Adding decorations
The most ordinary hairstyle can be transformed if you decorate it with a beautiful hairpin. Interesting decorations themselves create a unique image and add sophistication to you. Here is one of the hairstyle options with decoration.
Easy hairstyles for every day - step by step photos
Create easy hairstyles and be beautiful every day!